

Im sure quite a few of us had problems with bending tierods. Ive bent mine on my truck when i still had only 2" of lift, but now that i have a 6" lift i figuered it was time to do a tie rod end flip. Quite a few of us have done the TRE flip already but still use stock everythnig else. I found a thread awhile ago about upgrading to bigger tie rods and nobody seems to be aware of. So i thought i would do a write up on me doing mine.
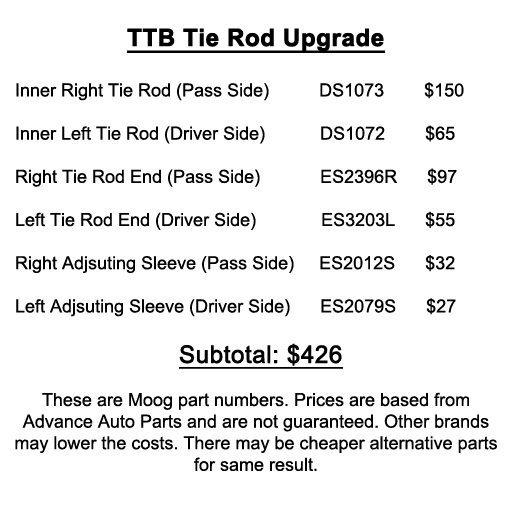
Here are the tierod parts i used (by Moog part number):
Long Inner Tie Rod (Passenger Side): DS1073
Short Inner Tie Rod (Driver Side): DS1072
Right Tie Rod End (Passenger Side): ES2396R
Left Tie Rod End (Driver Side): ES3203L
Right Adjsuting Sleeve (Passenger Side): ES2012S
Left Adjsuting Sleeve (Driver Side): ES2079S
REFER TO SECOND POST FOR OTHER BRAND PART NUMBERS
For the TRE Flip i used a reamer i bought on ebay for 70$. it needs to be a 1-1/2" taper AKA 7.15* taper. Its kind of expensive of a one use tool but it is needed to do the TRE Flip. Also it really helps to buy the Knuckle conversion sleeves to prevent from houglassing the hole after reaming. They can be bought at JBG HERE.
For the actuall TRE Flip instructions, this thread pretty much explains it better than i could. http://fullsizebronco.com/forum/showthread.php?t=174477&highlight=TRE+Flip.
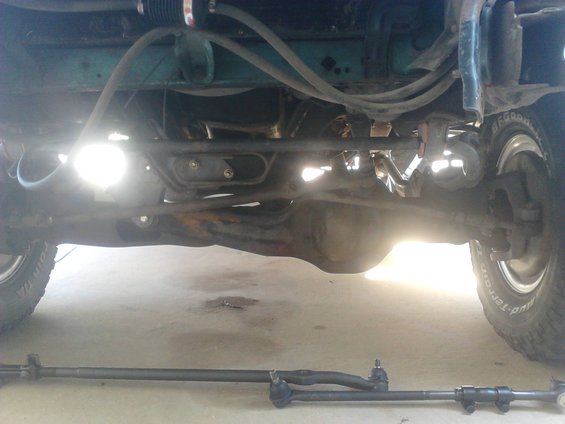
Stock steering after 6" lift. The long passenger side inner tie rod was slightly bent but not easily seen in the picture, I wanted to do a Tie Rod End flip to help straighten my steering out, Tie Rods were worn out. Figuered it was a perfect time to upgrade the steering. On the floor is the new bigger tie rods. they definatly are quite ticker than stock so they shouldnt bend nearly as easy.
I wont cover how to remove the tie rods. Its pretty easy jsut to bang them out with a hammer once the nut is removed. The stud going into the pitman arm can be very difficult and best bet is a pickel fork.Ii didnt have a one with me so i used a big adjsutable wrench as one

Comparision of the short (driver side) Inner Tie Rods with Tie rod ends attached. The new ones were perfect length, left alot of adjsutment in the sleeves for in and out. Try and keep both sides of the sleeves with an equal amount of threads. The picture doesnt really show but the new rods are defenitly stronger looking.

Comparison of thickness of the driver side Inner Tie Rods. The wrench shows the thickness of the new rod over the old. The new rod has a thinkness of about 7/8 of an inch compared to the stock wehich was about 3/4 of an inch. It doesnt sound like much more but it should help alot in strength.
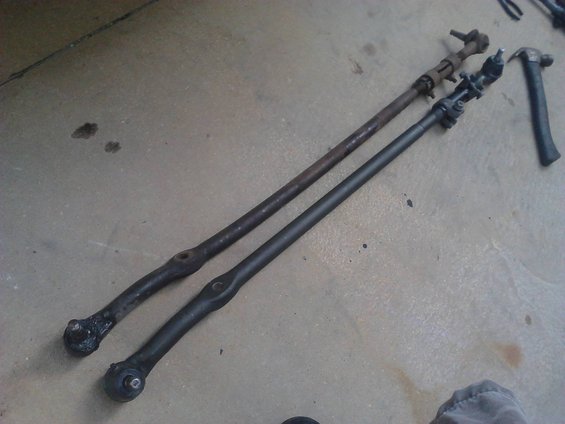
Comparision of the long (passenger side) Inner Tie Rods with Tie Rod Ends attached. The new ones were perfect length also, left alot of adjsutment in the sleeves for in and out. Try and keep both sides of the sleeves with an equal amount of threads. The picture somewhat shows that the new rods are defenitly stronger looking. Might also be able to see that the stock rod was slightly bent in some areas

Comparison of thickness of the passenger side Inner Tie Rods. The wrench shows the thickness of the new rod over the old. The new rod has a thinkness of about 1-1/4 inchs compared to the stock which was about 1 inch. It should help alot in strength.

This was for doing my Tie Rod End Flip. It places the TREs on the top of the knuckle instead of the bottom which raises them about 3" and can really help the strenght of your steering if you have a lift but no drop pitman arm. If you arn't doing the TRE Flip you can ignore the next few pictures.
Using a Reamer with 1-1/2" Taper AKA 7.15* Degree Taper, you ream the top of the hole till you can fit the TRE Conversion Sleeves all the way in. I bought the reamer on ebay for about 60$ shipping and i bought the conversion sleaves from JBG. Use cutting oil when reaming to prevent burning it up and go slowly.

The hole after reaming and putting in the conversion sleeve.
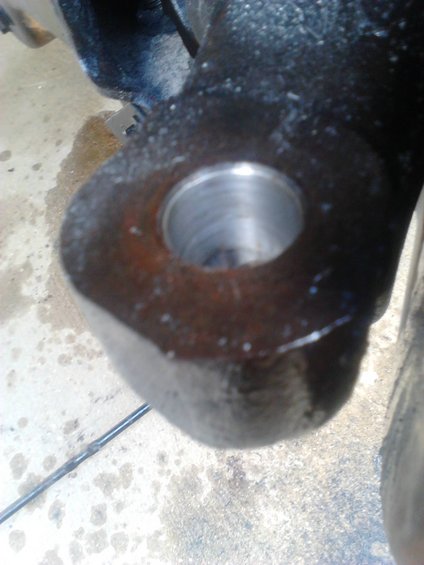
The conversion sleeve in. I reamed alittle too much on this side but it shouldnt have any problems. The point of the sleeves are to prevent making the hole into an hourglass shape which can make the TRE not stay in place as good.

Put the Tie Rod End in and tighten the nut and put the cotter pin in.

Do the other side. I went ahead and also put the Tie Rod on the pitman arm.

Put the driver side tie rod on the passenger side, put the nut on and tighten up. The hole for my cotter pin was too far away from the nut to catch it. I put another nut on backwardsso i can put the cotter pin in and it would prevent the first nut from backing loose.
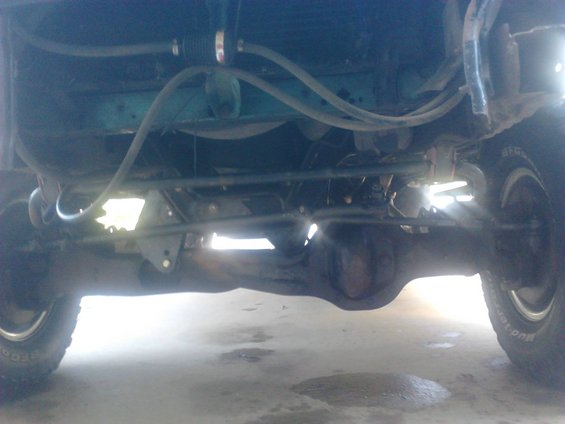
Finished. The TRE Flip really helped out weither you can see or not. The angle of the tie rods is significantly less which should help in strenght and turning. Everything worked out perfectly.
I did a quick DIY alignment using a tape measure to the center of the tires and got them as close as i could. It pulled alittle but should hold me over till i go get a real alignment.
it is a bit of an expensive upgrade. Probably best for when your exsiting is worn or bad. The joint studs are all the same size as stock. This can make it possible to do one side before the other if for some reason it was needed. This is a great upgrade weither you do the TRE Flip or not.
Here are the tierod parts i used (by Moog part number):
Long Inner Tie Rod (Passenger Side): DS1073
Short Inner Tie Rod (Driver Side): DS1072
Right Tie Rod End (Passenger Side): ES2396R
Left Tie Rod End (Driver Side): ES3203L
Right Adjsuting Sleeve (Passenger Side): ES2012S
Left Adjsuting Sleeve (Driver Side): ES2079S
REFER TO SECOND POST FOR OTHER BRAND PART NUMBERS
For the TRE Flip i used a reamer i bought on ebay for 70$. it needs to be a 1-1/2" taper AKA 7.15* taper. Its kind of expensive of a one use tool but it is needed to do the TRE Flip. Also it really helps to buy the Knuckle conversion sleeves to prevent from houglassing the hole after reaming. They can be bought at JBG HERE.
For the actuall TRE Flip instructions, this thread pretty much explains it better than i could. http://fullsizebronco.com/forum/showthread.php?t=174477&highlight=TRE+Flip.
Stock steering after 6" lift. The long passenger side inner tie rod was slightly bent but not easily seen in the picture, I wanted to do a Tie Rod End flip to help straighten my steering out, Tie Rods were worn out. Figuered it was a perfect time to upgrade the steering. On the floor is the new bigger tie rods. they definatly are quite ticker than stock so they shouldnt bend nearly as easy.
I wont cover how to remove the tie rods. Its pretty easy jsut to bang them out with a hammer once the nut is removed. The stud going into the pitman arm can be very difficult and best bet is a pickel fork.Ii didnt have a one with me so i used a big adjsutable wrench as one
Comparision of the short (driver side) Inner Tie Rods with Tie rod ends attached. The new ones were perfect length, left alot of adjsutment in the sleeves for in and out. Try and keep both sides of the sleeves with an equal amount of threads. The picture doesnt really show but the new rods are defenitly stronger looking.
Comparison of thickness of the driver side Inner Tie Rods. The wrench shows the thickness of the new rod over the old. The new rod has a thinkness of about 7/8 of an inch compared to the stock wehich was about 3/4 of an inch. It doesnt sound like much more but it should help alot in strength.
Comparision of the long (passenger side) Inner Tie Rods with Tie Rod Ends attached. The new ones were perfect length also, left alot of adjsutment in the sleeves for in and out. Try and keep both sides of the sleeves with an equal amount of threads. The picture somewhat shows that the new rods are defenitly stronger looking. Might also be able to see that the stock rod was slightly bent in some areas
Comparison of thickness of the passenger side Inner Tie Rods. The wrench shows the thickness of the new rod over the old. The new rod has a thinkness of about 1-1/4 inchs compared to the stock which was about 1 inch. It should help alot in strength.
This was for doing my Tie Rod End Flip. It places the TREs on the top of the knuckle instead of the bottom which raises them about 3" and can really help the strenght of your steering if you have a lift but no drop pitman arm. If you arn't doing the TRE Flip you can ignore the next few pictures.
Using a Reamer with 1-1/2" Taper AKA 7.15* Degree Taper, you ream the top of the hole till you can fit the TRE Conversion Sleeves all the way in. I bought the reamer on ebay for about 60$ shipping and i bought the conversion sleaves from JBG. Use cutting oil when reaming to prevent burning it up and go slowly.
The hole after reaming and putting in the conversion sleeve.
The conversion sleeve in. I reamed alittle too much on this side but it shouldnt have any problems. The point of the sleeves are to prevent making the hole into an hourglass shape which can make the TRE not stay in place as good.
Put the Tie Rod End in and tighten the nut and put the cotter pin in.
Do the other side. I went ahead and also put the Tie Rod on the pitman arm.
Put the driver side tie rod on the passenger side, put the nut on and tighten up. The hole for my cotter pin was too far away from the nut to catch it. I put another nut on backwardsso i can put the cotter pin in and it would prevent the first nut from backing loose.
Finished. The TRE Flip really helped out weither you can see or not. The angle of the tie rods is significantly less which should help in strenght and turning. Everything worked out perfectly.
I did a quick DIY alignment using a tape measure to the center of the tires and got them as close as i could. It pulled alittle but should hold me over till i go get a real alignment.
it is a bit of an expensive upgrade. Probably best for when your exsiting is worn or bad. The joint studs are all the same size as stock. This can make it possible to do one side before the other if for some reason it was needed. This is a great upgrade weither you do the TRE Flip or not.


