

This is my write-up on how to convert the Dana 44 TTB into 8-lug with 8x6.5 lug pattern. The main purpose of this is to have the same lug pattern in the front as the rear after doing a Sterling or 1-ton axle swap. Some of the main parts i got from someone on the forums but alot of the parts i had to order from parts store and some parts from other online places. For the parts i had to get at the part store i used a 1986 Chevy K20 as a reference. This is being done to my 96 Bronco with manual locking hubs so your vehicle might slightly differ in some areas. My manual hubs also damaged so I ordered Mile Marker Premium lockouts for half the price and still lifetime warranty.
🚩
Update: Just a FYI, there are 3 versions of the axleshafts you can use depending how strong you want to use:
OEM Dana Spicer #41677 and are avalible on Amazon or Rockauto. Fine for daily driving light offroading.
Yukon #YA D41677 (21086) are a direct aftermarekt replacement made in 1541H. Should be stronger than Spicer but cost significantly more
Yukon #YA W38815 (21355) are a 4340 chromoly axleshaft for highest strength but will cost the most.
![Image]()
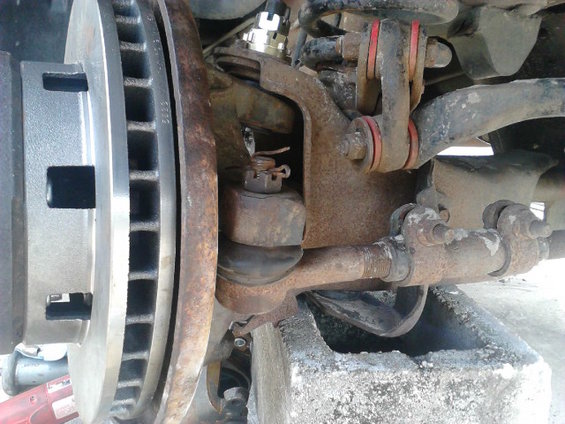
Jack of the truck and take the wheel off and put jackstands under it. I had to use cinder blocks which I wouldn't recommend but its all i had. Take the lockout cap bolts out and tap the cap off. The bolts have a tendency to strip very easily so watch for that.
![Image]()
Take off the small C-clip that is around the axleshaft.
![Image]()
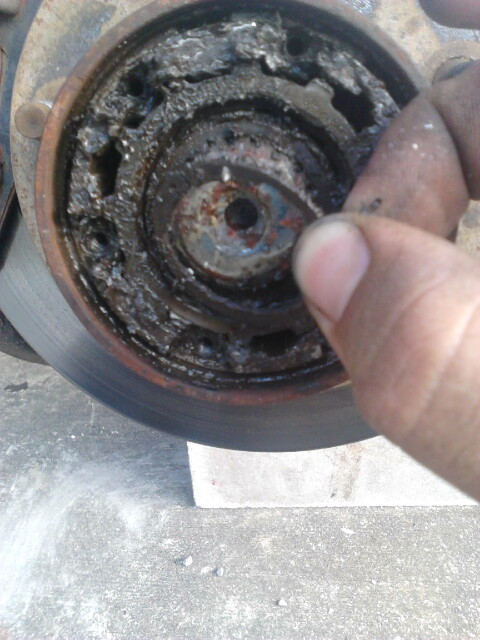
Use a pick or 2 to remove the big clip around the inside of the hub. Its usually hidden by grease and can be a pain to get out without picks. Might need to tap the lockout assembly inward to get it out
![Image]()
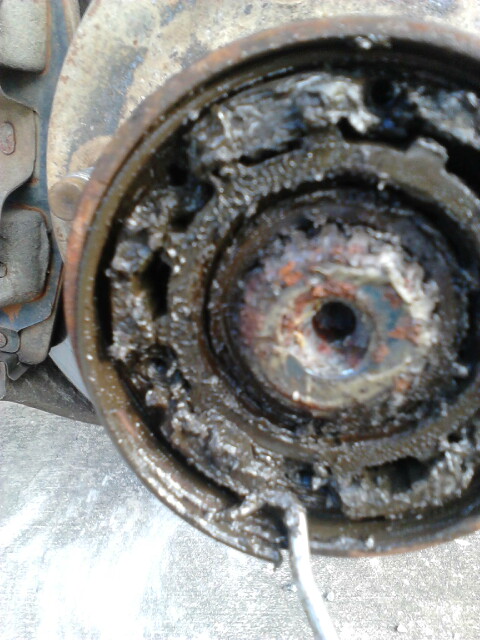
Place 2 or more of the cap bolts back in a good number of threads. use them to help pull it out. My lockout being slightly damaged made it very tricky to get out.
![Image]()
Use a 4 prong spindle nut socket to get the first spindle nut off. my threads on my spindle are damaged so i used an impact wrench to zip it off quickly. If you have auto-locking hubs you will have a different style spindle nut.
![Image]()
With the first spindle nut out, use a pick or needlenose to take out the lock washer. once out, use the spindle nut socket to take out the last spindle nut.
![Image]()
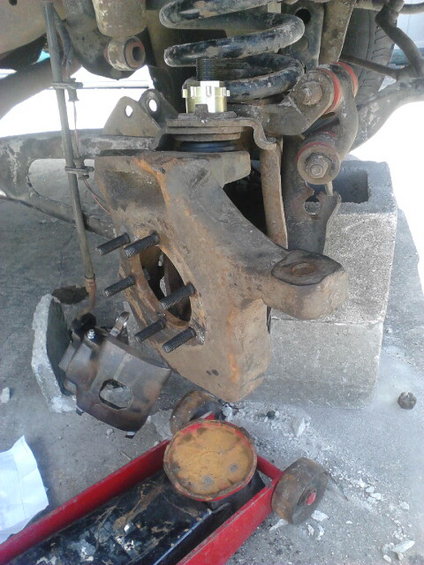
Take the caliper off. Your suppose to support it so it doesn't hang by the hose but since the hose is getting replaced I didn't really worry about it too much so and just left it hanging out of the way. Pull the rotor\hub assembly off. If the inner bearing and seal didnt stay in the hub, pull it off also.
![Image]()
This is a slide hammer and 4WD Spindle Puller Adapter i use to quickly take the spindle off. Ive gotten some badly rusted spindles off no problem and doesn't damage anything. Autozone no longer sells/loans out the spindle puller adapter but it can still be bought online such as Amazon for around 30$ using OEMTOOLS #27104. there are other brands such as the OTC7502 but they more. The slide hammer is available as a loaner tool at most auto part stores if you do not wish to buy it.
![Image]()
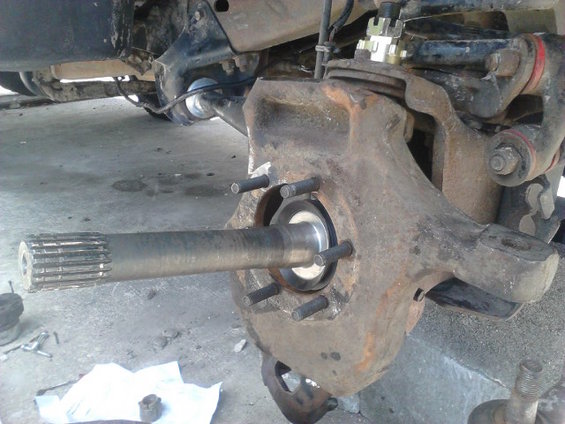
Take off the 5 or 6 spindle nuts. to make everything easier i used a slide hammer and spindle puller setup. 3 hits had the spindle off in less than 10 seconds and no damage to anything
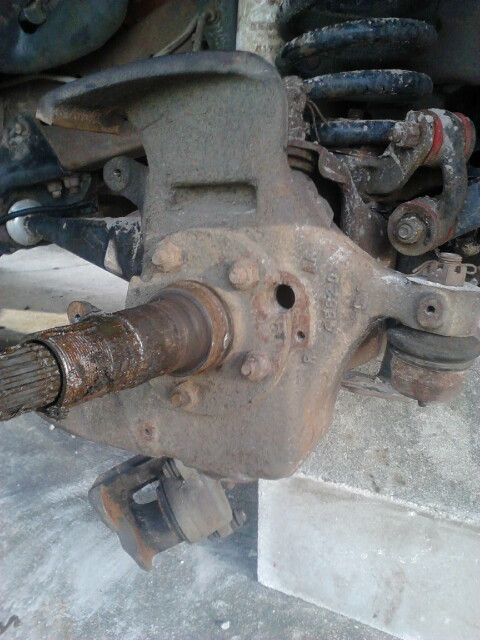
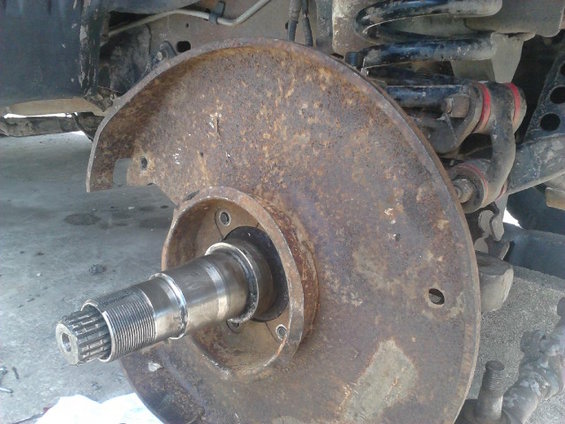
I had 4WABS on this truck but from a previous time taking the spindle off, i already had to take the sensor off (notice the hole). Getting the sensor off is a PITA. if i remeber it uses a 12-point 6mm or 5.5mm bolt, not sure. Either way the bolt never comes out and almost always has to be broken off. I never liked ABS so i never bothered spending the money to get it fixed. Taking out this sensor will make the ABS light come on and no longer work.
![Image]()
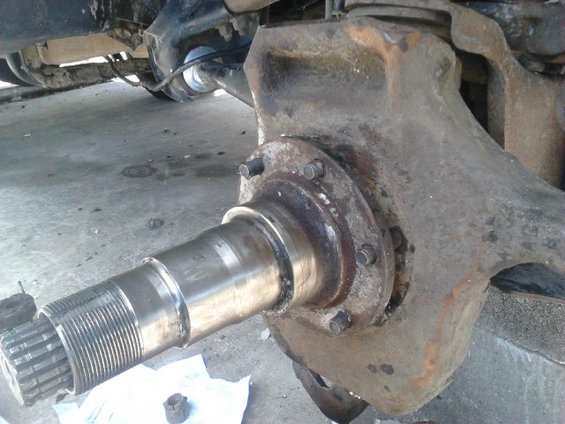
Spindle came off like nothing thanks to the slide hammer/puller setup. 3 hits less than 10 seconds.
![Image]()
Pull the axle shaft out. For the passenger side shaft, you will have to undo the bands holding the slip yoke boot that is near the differential.
![Image]()
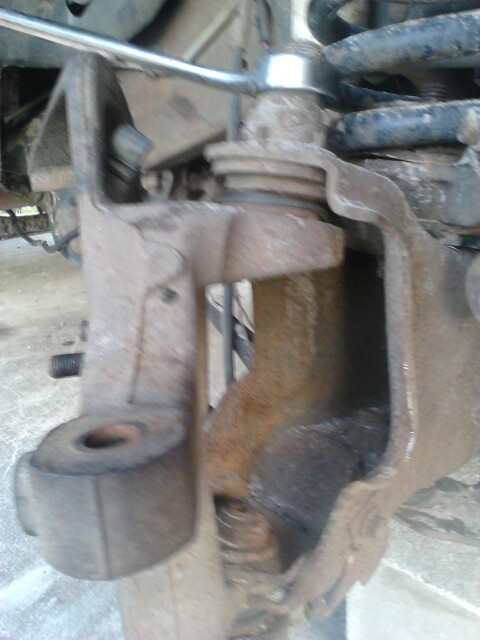
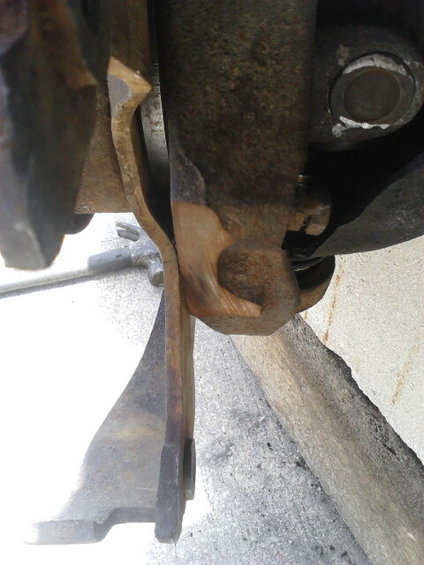
Take the Tie Rod End off the knuckle.
Best way is take the nut off and put it back on upside down so the nut is flush with the top of the threads. use a hammer and tap it down till it breakes free. This prevents damageing the threads. Then take the nut off and move it aside.
![Image]()
Since my knuckle uses the 5 stud, im going to have to take it off and switch to a 6 stud knuckle used on the older TTB trucks. If you already have the 6 stud knuckle, you dont really need to take it off however it might help when cutting the caliper ears off. If you try without taking the knuckle off you can skip some of these steps. However being this far you might as well do new balljoints anyways.
Take the cotter pit out of the top balljoint nut and take the nut off. the sizes may vary but mine is 1 1/8" on the top and bottom.
![Image]()
Take the alignment bushing out. this can be tricky sometimes. I use a hammer and hit the balljoint stud down till it breaks free. this lets the bushing come out easier and can use a chisle or channellocks to take it our. im using new balljoints so i didnt bother taking the extra step of protecting the threads.
Getting the bottom balljoint broken free is an even harder chalange. It may help to use a picklefork but i didnt have one. i used a combination of heat, hammer, airchisel, and sledgehammer. finnally got it but smashed my thumb when the knuckle dropped.
![Image]()
Got the knuckle off. This being the 5 stud knuckle, it threw it in my shed of spare parts. If you Have the 6 stud knuckle your gonna be using it.
![Image]()
6 stud steering knuckle needed for the swap. Mine was only 5 stud so i had to use these which came from my 88 Bronco. We are going to have to cut off the ears which hold the brake caliper in order to use the Chevy backing plate.
![Image]()
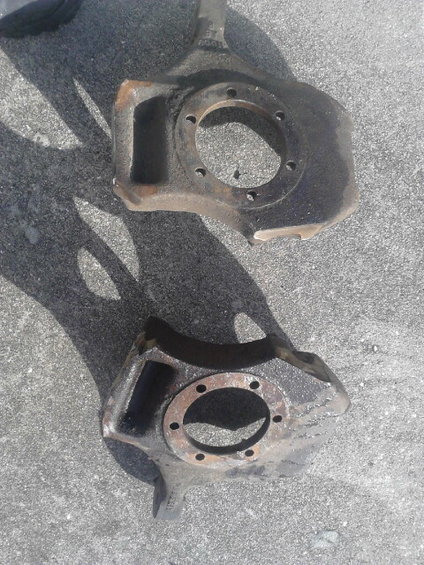
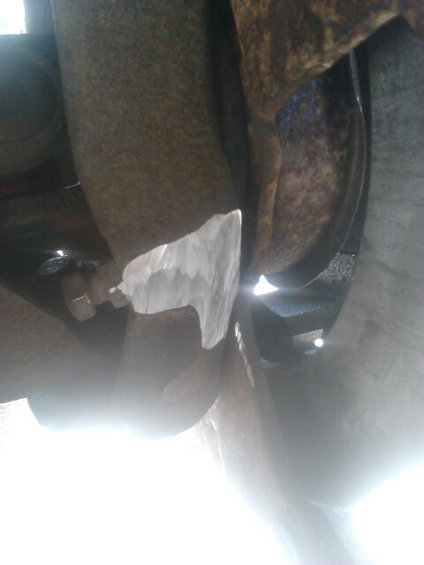
The steering knuckles after cutting the caliper ears off. i cut it where i can get the most off without doing too much cutting. Ill grind down whatever more i have to once i find out where and how much. The metal for the ears are pretty thick. I happen to have a chopsaw availible which came in handy making the cuts. Take out the spindle studs before cutting to make it easier. you will have to put in the chevy studs anyways cause there longer. They just tap out with a hammer.
![Image]()
Another look at where i cut. This might give you a general idea tho where to cut.
![Image]()
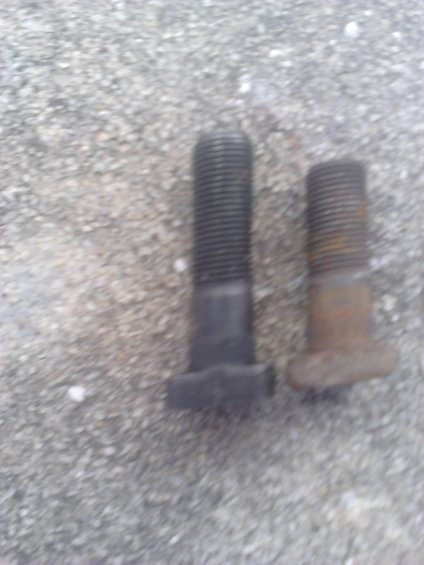
The spindle studs. Right is the old Ford studs. Left is the studs i ordered. I didnt have the actuall Chevy studs to use so i ordered these online. The Chevy studs are longer than the Ford studs due to the backing plate. I got these from www.partmike.com and it came with all 12 needed and nuts inclueded. They are the 3/8" not 7/16" studs.
1-PM63262-12 D44 SPINDLE STUD SET
![Image]()
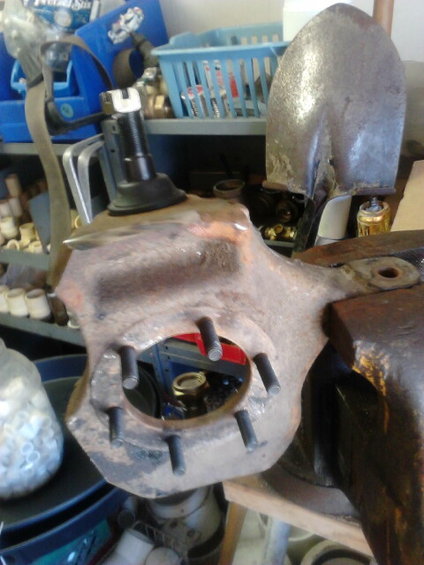
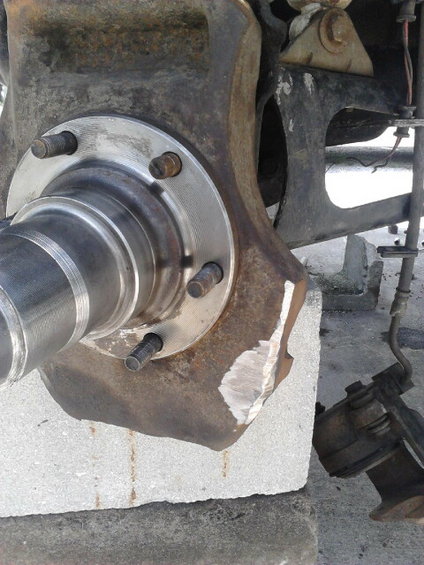
Got the new spindle studs installed and new balljoints in. The studs have a cuttout on the head. have the cuttout facing toawd the center so it wont interfere with the axleshaft. I used a hammer to put the studs in as much as i can. that way they dont spin when you press them in. Use a few washers and one of the nuts to pull the studs into place. Dont overtighten them tho, ive had them strip or break without much force. Even striped one of my new ones.
Used a balljoint press loaner tool. Popped the old ones out and new ones in. Clean the hole before pressing the new ones in and use a lubricating oil to help them go in correctly and easily.
![Image]()
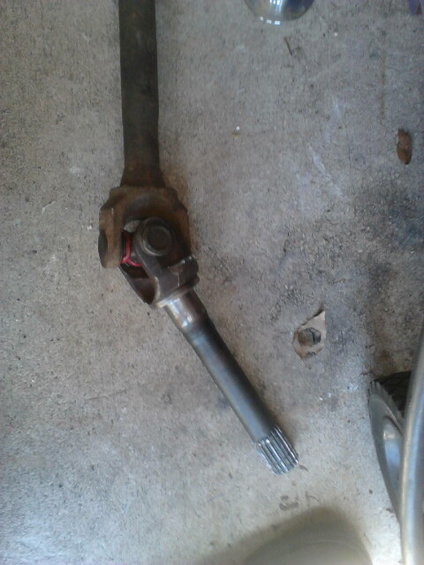
Chevy vs Ford outter axle shaft. Right is the Ford outter axleshaft still attached. Left is the Chevy that is going on. Notice the different lenghts, different positions of seal and spindle bearing.
![Image]()
The Chevy outter axle shaft on with a new u-joint. To get the shaft back into the axle you MAY need to grind down the edges of the caps. If you dont know where to grind, you will see when you try and put it back in. Even the facotry joints have the edges removed.
![Image]()
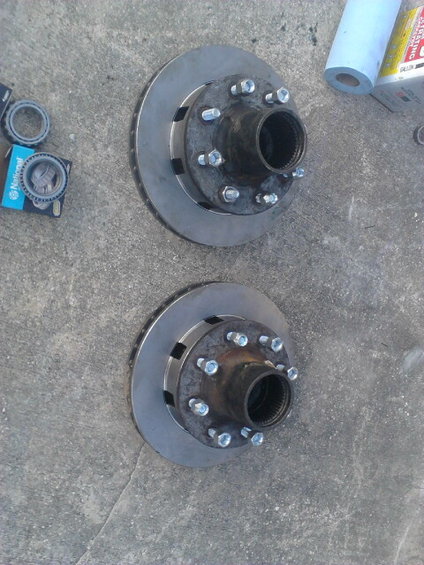
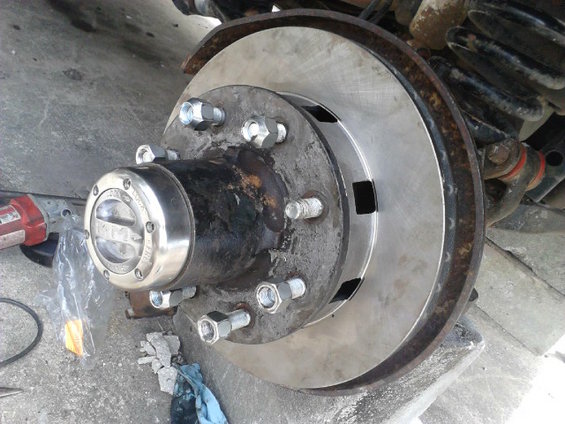
Hub/rotors all setup. outer wheel bearings use a A35 bearing (SET45 Timken). For the inner, you have to buy the race and cone seperate. The race is a JLM104910 and the cone is a LM104910. I ALWAYS use new bearings inclueding races, better safe than sorry. I had to buy new rotors and studs as the hubs I got from somebody. to press in the studs I used the same meathod as the spindle studs. hammer and airchisel the studs in as much as i can. put a few washers on the stud and use a lugnut to pull them in. defiantly want to use a lubricating oil on the slines of the studs and threads. Use an impact wrench lightly to tighten the nut till its all the way in but be careful about damaging the threads from heat.
![Image]()
Put the knuckle back on. Put the alignment bushing in. Tighten the bottom balljoint to 35-40 lbs. then tighten the top to 85-100 lbs. then re-tighten the lower to 95-110 lbs. I use adjustable alignment bushings and since i got new balljoints I set the bushings to Neutral (0* camber, 0* caster). Ill take it to get alignment later.
![Image]()
Put the axle shaft back in. Put on a new spindle seal. For the passenger side, make sure the shaft goes back into the slipyoke correctly. Might have to clean the splines for the yoke and put some grease on them. If the u-joint on the shaft does not go through the hole of the knuckle, you will have to grind down the edges of the u-joint caps but dont grind too far where you go through the cap.
![Image]()
Put the spindle on with the notch in the threads to be up. I used that slidehammer/puller setup to hammer it back on evenly. Worked great.
![Image]()
Put the backing plate on. Check where it might be hitting the knuckle. Grind where nessesary.
![Image]()
I accidentally stripped and screwed up one of the studs so i used a ford one just to see if it would work. The right stud is an original ford stud. it is technically long enough to work but not unless the spindle and backing plate are completly against the knuckle. This means if you try and use the studs to get the spindle and backing plate in place it wont work. The left stud the one that i bought. There are plenty of threads and almost too many but it wasn't a problem.
![Image]()
The backing plate is hitting here so i have to grind it down alittle.
![Image]()
The area the backing plate slightly hitting the knuckle here. This had to grind this down alittle. I did alittle extra to make the area smooth.
![Image]()
Put the backing plate back on. Make sure you have the caliper position right before tightening up the spindle nuts. The spindle nuts should be tightened to 35-40 lbs. Before tightening them all, you might want to try putting the caliper in place and find out how much you need to grind off the knuckle so it will fit. In order to put the caliper on i had to grind this down a good amound. caliper needs to be able to slide freely witout hitting this.
![Image]()
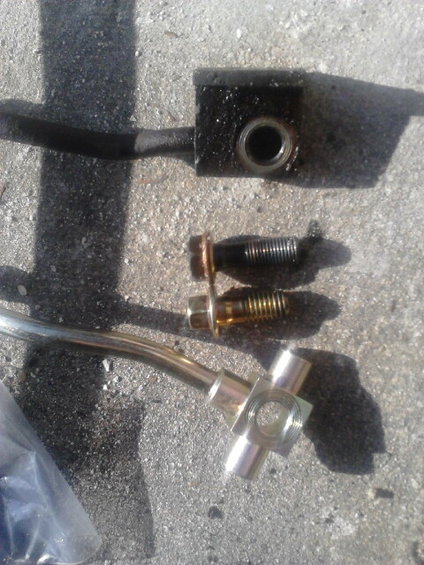
Top is the original Ford brake hose and bolt. Bottom is a new Chevy brake hose and bolt. The ford bolt uses a more fine thread bolt that is longer and is slightly narrower. the chevy bolt is slightly wider and it will not fit the ford hose properly. Had to get new brake hoses.
![Image]()
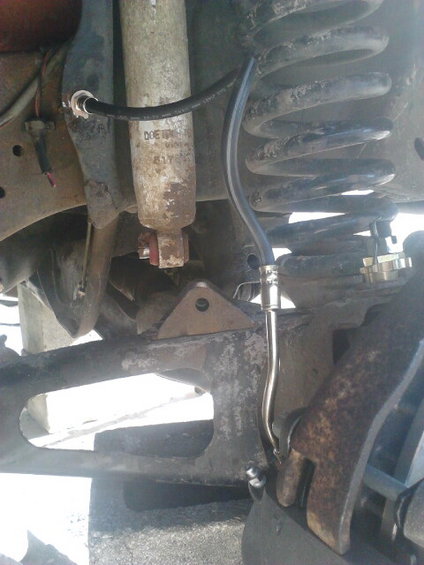
New chevy brake hose installed. It doesnt correctly mount to the frame so ill have to find a way to hold it better later. I did this after putting the rotor/hub assembly on. Probably better doing before doing that. Dont forget to bleed the brakes. I worked by myself so i jsut gravity blead them.
![Image]()
Pack the wheelbearings with a good quality wheel bearing grease rated for disk brakes, tap the wheel seal on the back of the hub. Put the hub/rotor assembly on. Pack the inside with alot of grease and put the outter wheel bearing in. Put the first spindle nut on. It will have a little nub on 1 side which points away from the truck. Tighten to 70 lbs while spinning the rotor to seat the bearing. Once seated, back the nut off 1/4 turn and then retorque to 15-20 lbs. Put the lockwasher on making sure the nub of the that first nut goes fulling into one the the washers many holes. It helps it wipe the grease awya from the nub to see it and the nut might need to slightly be turned to align with the washer. After the washer is in put the second spindle nut on (it wont have the nub like the first nut) and torque it to about 150 lbs.
The idea is that the first nut puts the preload of the wheel bearings. The washer holds the nut in place by locking with the nub of the nut and the notch in the spindle. the third nut just acts to lock the washer and other nut in place
![Image]()
Put the lockout assembly in. Put the inner and outer lockrings in. Might need to pry the axleshaft outward by using a large screwdriver on the u-joint of the axleshaft. I used MileMarker Supreme at the time but did not like them. Have used Warn Standard ever since. Warn Premium lockouts tend to bind on every axle i ever used them on including this one
![Image]()
Put the lockout cap and the 6 screws in. Make sure the lockout opperates as should. easy way to tell is watch the axleshaft when spinning the rotor. when locked the axleshaft will spin with the rotor. when unlocked the axleshaft wont spin.
![Image]()
Put the Tierod back on. If the stud just spins, try putting pressure upward. If it still spins try using a jack to force it up with more force.
Put the tire back on, do the other side then you should be done.

Click the pic to zoom in. I got some parts from someone else (hubs, spindles, and backing plate) and i got the steering knuckles form my 88 Bronco. I didn't list Lockout Hubs because most people will will reuse there old or use Warn. Some other stuff like loaner tools or grease and stuff i didnt list either.

How it looks with the wheel on. Wheels i got from a friend who i htink got them from a non-Superduty F-250.

My truck after the 8-lug conversion and Dana 60 Semi-floating swap. Took this picture after installing my 6" lift in the front, the rear only has 3" for now. Not the best looking truck but thats what happens to a truck you mud and jump without second thoughts
🚩
Update: Just a FYI, there are 3 versions of the axleshafts you can use depending how strong you want to use:
OEM Dana Spicer #41677 and are avalible on Amazon or Rockauto. Fine for daily driving light offroading.
Yukon #YA D41677 (21086) are a direct aftermarekt replacement made in 1541H. Should be stronger than Spicer but cost significantly more
Yukon #YA W38815 (21355) are a 4340 chromoly axleshaft for highest strength but will cost the most.
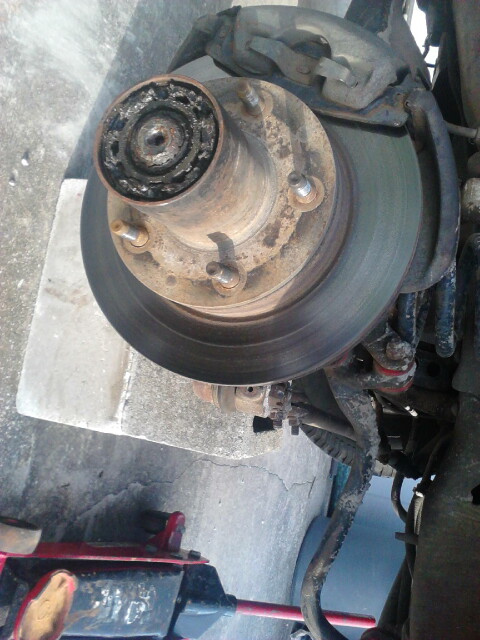
Jack of the truck and take the wheel off and put jackstands under it. I had to use cinder blocks which I wouldn't recommend but its all i had. Take the lockout cap bolts out and tap the cap off. The bolts have a tendency to strip very easily so watch for that.
Take off the small C-clip that is around the axleshaft.
Use a pick or 2 to remove the big clip around the inside of the hub. Its usually hidden by grease and can be a pain to get out without picks. Might need to tap the lockout assembly inward to get it out

Place 2 or more of the cap bolts back in a good number of threads. use them to help pull it out. My lockout being slightly damaged made it very tricky to get out.
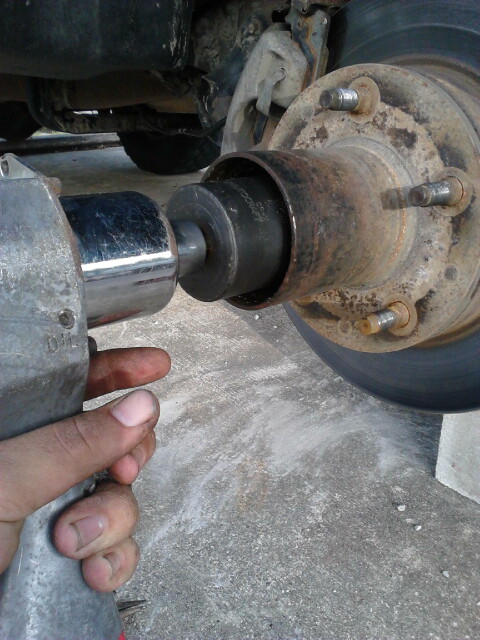
Use a 4 prong spindle nut socket to get the first spindle nut off. my threads on my spindle are damaged so i used an impact wrench to zip it off quickly. If you have auto-locking hubs you will have a different style spindle nut.

With the first spindle nut out, use a pick or needlenose to take out the lock washer. once out, use the spindle nut socket to take out the last spindle nut.
Take the caliper off. Your suppose to support it so it doesn't hang by the hose but since the hose is getting replaced I didn't really worry about it too much so and just left it hanging out of the way. Pull the rotor\hub assembly off. If the inner bearing and seal didnt stay in the hub, pull it off also.
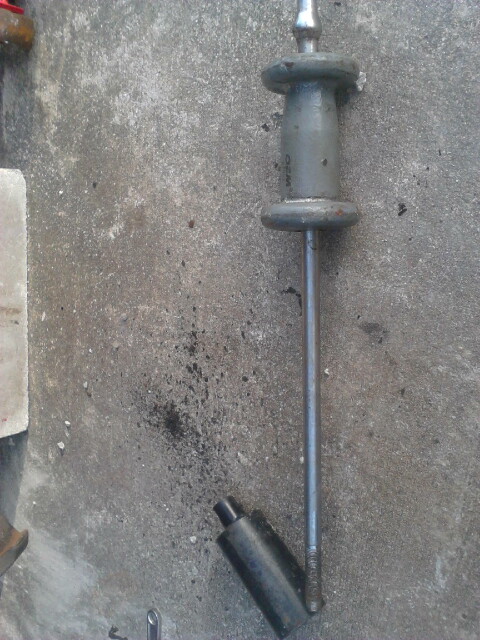
This is a slide hammer and 4WD Spindle Puller Adapter i use to quickly take the spindle off. Ive gotten some badly rusted spindles off no problem and doesn't damage anything. Autozone no longer sells/loans out the spindle puller adapter but it can still be bought online such as Amazon for around 30$ using OEMTOOLS #27104. there are other brands such as the OTC7502 but they more. The slide hammer is available as a loaner tool at most auto part stores if you do not wish to buy it.
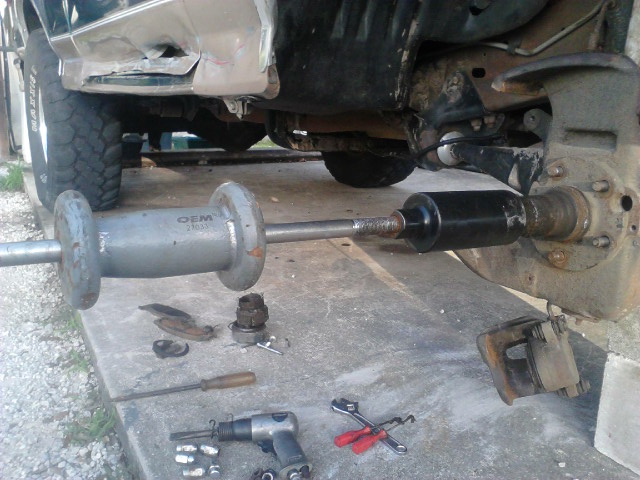
Take off the 5 or 6 spindle nuts. to make everything easier i used a slide hammer and spindle puller setup. 3 hits had the spindle off in less than 10 seconds and no damage to anything
I had 4WABS on this truck but from a previous time taking the spindle off, i already had to take the sensor off (notice the hole). Getting the sensor off is a PITA. if i remeber it uses a 12-point 6mm or 5.5mm bolt, not sure. Either way the bolt never comes out and almost always has to be broken off. I never liked ABS so i never bothered spending the money to get it fixed. Taking out this sensor will make the ABS light come on and no longer work.
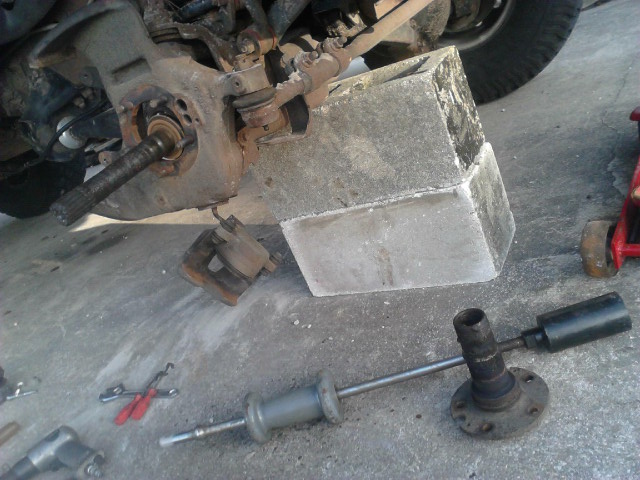
Spindle came off like nothing thanks to the slide hammer/puller setup. 3 hits less than 10 seconds.

Pull the axle shaft out. For the passenger side shaft, you will have to undo the bands holding the slip yoke boot that is near the differential.

Take the Tie Rod End off the knuckle.
Best way is take the nut off and put it back on upside down so the nut is flush with the top of the threads. use a hammer and tap it down till it breakes free. This prevents damageing the threads. Then take the nut off and move it aside.
Since my knuckle uses the 5 stud, im going to have to take it off and switch to a 6 stud knuckle used on the older TTB trucks. If you already have the 6 stud knuckle, you dont really need to take it off however it might help when cutting the caliper ears off. If you try without taking the knuckle off you can skip some of these steps. However being this far you might as well do new balljoints anyways.
Take the cotter pit out of the top balljoint nut and take the nut off. the sizes may vary but mine is 1 1/8" on the top and bottom.

Take the alignment bushing out. this can be tricky sometimes. I use a hammer and hit the balljoint stud down till it breaks free. this lets the bushing come out easier and can use a chisle or channellocks to take it our. im using new balljoints so i didnt bother taking the extra step of protecting the threads.
Getting the bottom balljoint broken free is an even harder chalange. It may help to use a picklefork but i didnt have one. i used a combination of heat, hammer, airchisel, and sledgehammer. finnally got it but smashed my thumb when the knuckle dropped.

Got the knuckle off. This being the 5 stud knuckle, it threw it in my shed of spare parts. If you Have the 6 stud knuckle your gonna be using it.

6 stud steering knuckle needed for the swap. Mine was only 5 stud so i had to use these which came from my 88 Bronco. We are going to have to cut off the ears which hold the brake caliper in order to use the Chevy backing plate.
The steering knuckles after cutting the caliper ears off. i cut it where i can get the most off without doing too much cutting. Ill grind down whatever more i have to once i find out where and how much. The metal for the ears are pretty thick. I happen to have a chopsaw availible which came in handy making the cuts. Take out the spindle studs before cutting to make it easier. you will have to put in the chevy studs anyways cause there longer. They just tap out with a hammer.

Another look at where i cut. This might give you a general idea tho where to cut.
The spindle studs. Right is the old Ford studs. Left is the studs i ordered. I didnt have the actuall Chevy studs to use so i ordered these online. The Chevy studs are longer than the Ford studs due to the backing plate. I got these from www.partmike.com and it came with all 12 needed and nuts inclueded. They are the 3/8" not 7/16" studs.
1-PM63262-12 D44 SPINDLE STUD SET
Got the new spindle studs installed and new balljoints in. The studs have a cuttout on the head. have the cuttout facing toawd the center so it wont interfere with the axleshaft. I used a hammer to put the studs in as much as i can. that way they dont spin when you press them in. Use a few washers and one of the nuts to pull the studs into place. Dont overtighten them tho, ive had them strip or break without much force. Even striped one of my new ones.
Used a balljoint press loaner tool. Popped the old ones out and new ones in. Clean the hole before pressing the new ones in and use a lubricating oil to help them go in correctly and easily.

Chevy vs Ford outter axle shaft. Right is the Ford outter axleshaft still attached. Left is the Chevy that is going on. Notice the different lenghts, different positions of seal and spindle bearing.
The Chevy outter axle shaft on with a new u-joint. To get the shaft back into the axle you MAY need to grind down the edges of the caps. If you dont know where to grind, you will see when you try and put it back in. Even the facotry joints have the edges removed.
Hub/rotors all setup. outer wheel bearings use a A35 bearing (SET45 Timken). For the inner, you have to buy the race and cone seperate. The race is a JLM104910 and the cone is a LM104910. I ALWAYS use new bearings inclueding races, better safe than sorry. I had to buy new rotors and studs as the hubs I got from somebody. to press in the studs I used the same meathod as the spindle studs. hammer and airchisel the studs in as much as i can. put a few washers on the stud and use a lugnut to pull them in. defiantly want to use a lubricating oil on the slines of the studs and threads. Use an impact wrench lightly to tighten the nut till its all the way in but be careful about damaging the threads from heat.
Put the knuckle back on. Put the alignment bushing in. Tighten the bottom balljoint to 35-40 lbs. then tighten the top to 85-100 lbs. then re-tighten the lower to 95-110 lbs. I use adjustable alignment bushings and since i got new balljoints I set the bushings to Neutral (0* camber, 0* caster). Ill take it to get alignment later.
Put the axle shaft back in. Put on a new spindle seal. For the passenger side, make sure the shaft goes back into the slipyoke correctly. Might have to clean the splines for the yoke and put some grease on them. If the u-joint on the shaft does not go through the hole of the knuckle, you will have to grind down the edges of the u-joint caps but dont grind too far where you go through the cap.
Put the spindle on with the notch in the threads to be up. I used that slidehammer/puller setup to hammer it back on evenly. Worked great.
Put the backing plate on. Check where it might be hitting the knuckle. Grind where nessesary.

I accidentally stripped and screwed up one of the studs so i used a ford one just to see if it would work. The right stud is an original ford stud. it is technically long enough to work but not unless the spindle and backing plate are completly against the knuckle. This means if you try and use the studs to get the spindle and backing plate in place it wont work. The left stud the one that i bought. There are plenty of threads and almost too many but it wasn't a problem.
The backing plate is hitting here so i have to grind it down alittle.
The area the backing plate slightly hitting the knuckle here. This had to grind this down alittle. I did alittle extra to make the area smooth.
Put the backing plate back on. Make sure you have the caliper position right before tightening up the spindle nuts. The spindle nuts should be tightened to 35-40 lbs. Before tightening them all, you might want to try putting the caliper in place and find out how much you need to grind off the knuckle so it will fit. In order to put the caliper on i had to grind this down a good amound. caliper needs to be able to slide freely witout hitting this.
Top is the original Ford brake hose and bolt. Bottom is a new Chevy brake hose and bolt. The ford bolt uses a more fine thread bolt that is longer and is slightly narrower. the chevy bolt is slightly wider and it will not fit the ford hose properly. Had to get new brake hoses.
New chevy brake hose installed. It doesnt correctly mount to the frame so ill have to find a way to hold it better later. I did this after putting the rotor/hub assembly on. Probably better doing before doing that. Dont forget to bleed the brakes. I worked by myself so i jsut gravity blead them.

Pack the wheelbearings with a good quality wheel bearing grease rated for disk brakes, tap the wheel seal on the back of the hub. Put the hub/rotor assembly on. Pack the inside with alot of grease and put the outter wheel bearing in. Put the first spindle nut on. It will have a little nub on 1 side which points away from the truck. Tighten to 70 lbs while spinning the rotor to seat the bearing. Once seated, back the nut off 1/4 turn and then retorque to 15-20 lbs. Put the lockwasher on making sure the nub of the that first nut goes fulling into one the the washers many holes. It helps it wipe the grease awya from the nub to see it and the nut might need to slightly be turned to align with the washer. After the washer is in put the second spindle nut on (it wont have the nub like the first nut) and torque it to about 150 lbs.
The idea is that the first nut puts the preload of the wheel bearings. The washer holds the nut in place by locking with the nub of the nut and the notch in the spindle. the third nut just acts to lock the washer and other nut in place

Put the lockout assembly in. Put the inner and outer lockrings in. Might need to pry the axleshaft outward by using a large screwdriver on the u-joint of the axleshaft. I used MileMarker Supreme at the time but did not like them. Have used Warn Standard ever since. Warn Premium lockouts tend to bind on every axle i ever used them on including this one
Put the lockout cap and the 6 screws in. Make sure the lockout opperates as should. easy way to tell is watch the axleshaft when spinning the rotor. when locked the axleshaft will spin with the rotor. when unlocked the axleshaft wont spin.
Put the Tierod back on. If the stud just spins, try putting pressure upward. If it still spins try using a jack to force it up with more force.
Put the tire back on, do the other side then you should be done.
Click the pic to zoom in. I got some parts from someone else (hubs, spindles, and backing plate) and i got the steering knuckles form my 88 Bronco. I didn't list Lockout Hubs because most people will will reuse there old or use Warn. Some other stuff like loaner tools or grease and stuff i didnt list either.
How it looks with the wheel on. Wheels i got from a friend who i htink got them from a non-Superduty F-250.
My truck after the 8-lug conversion and Dana 60 Semi-floating swap. Took this picture after installing my 6" lift in the front, the rear only has 3" for now. Not the best looking truck but thats what happens to a truck you mud and jump without second thoughts


 opc1:
opc1:


