

I get tired of typing this, and figured this was the best post I could do for a step by step on how to properly set timing on a 302 or 351 in a technical write up.
This is my routine and works every time.
These first steps are to be able to fire it up without a timing light. These first directions are for new motor installs, or if you've pulled the distributor and didn't mark the distributor before removing it.
This is step by step for a 302 or a 351
Step one.
Make sure auto trans is in Park and parking brake on, or if it's a manual trans in neutral and parking brake on (safety first). And leave the key removed from ignition as you don't want the engine to start while using this process.
Step two.
Make sure your timing marks are clean and can be read. These are located on the harmonic balancer. Clean them up with a wire brush or some sandpaper. Mark 10* BTDC with a white/yellow crayon. There will be two 10's showing, you want the red 10 below. The marks will look like:
ATC10||||0||||10||||20||||30BTC (Each "|" represents 2 degrees)
Step three.
Pull number one plug. It's the front plug on passenger side.
Step four. (This is where step one is IMPORTANT, if you don't believe me, go ask Garlic Bronco :doh0715")
Using a screwdriver, bump the starter relay. When doing so, put a finger over the plug hole. As soon as you feel the big gush of air.......
![Image]()
Step five.
Locate your 10* BTC and this should be relatively close to your timing pointer. It might be before or slightly after. If it's before (spinning in clockwise direction), turn it so the 10*BTC lines up with the pointer like so. If it went past the timing pointer, then you can either turn it counter clockwise to meet the mark, or spin the crank so that the 10*BTC mark passes the timing pointer once (going clockwise) and stopping on the timing pointer on the second spin (clockwise).
This should be number 1 compression stroke.
Most people will recommend stabbing the distributor at 0*TDC. This thread is about how I do this, every time.
Notice something here. And this is why I do this at 10*BTC and not 0*TDC:
ATC10||||0||||10||||20||||30BTC<------notice 10*BTC is centered
ATC10||||0||||10||||20||||30BTC<------notice 0*TDC is not centered.
If stabbing the distributor at 0*TDC, and positioning the distributor so that the ignition module(if equipped) is pointing at a 45* (towards driver's headlight), then the stab wasn't centered. Positioning at 10*BTC, your centered on the timing marks, and centered on the stab of the distributor. This allows maximum EQUAL advance and retarding on the timing. Not more one way than the other which in turn can affect you getting it running on the first time.
Step six.
Grab the distributor and cap, and make a mark on the distributor plastic base for contact number one. This mark will be in the same spot as in this picture. Going by the screw in the picture, number one will be just to the left of the screw as seen by the black mark in the picture. Make a mark like so.
Step seven.
Time to drop the distributor in. Start the drop so the rotor is to the left of the black mark, ignition module at 45* angle. Now when the distributor gear marries the cam gear, the rotor will spin clockwise. You want to drop it in so the left tip of the rotor is about to make contact with the black mark like seen in the picture below when the distributor is fully seated. This will be real close to 10*BTC. And you'll be able to dial it in once running with a light. You also want to drop it in so that the ignition module (if equipped, if not, flat spot on distributor) is pointing at a 45 degree angle. Basically, aim it so it's pointing towards the driver's side head light. This will allow you maximum room to turn distributor both directions when setting final timing with a light. Then tighten the hold down bolt snug so the distributor turns but not to easily.
If you have the distributor fully seated into the block, and rotor positioned as shown in photo above (left tip rotor meets contact point of number 1) then it's time to wire it up. If distributor isn't fully seated, it's most likely because the oil pump shaft didn't slide into the distributor. If this happens, turn the crank with a 15/16 socket & ratchet and it'll drop in once the distributor turns. Won't take much of a turn. Then tighten the hold down bolt snug so the distributor turns but not too easily.
Step eight.
Replace cap and wire it up. 13726548 is the Windsor firing order. 15426378 is the older 302 and non HO motors firing order. This may vary due to cam changes. But will be one or the other.
Now verify firing order again. Fire it up. :thumbup
If it runs good, time it with a light with the spout unplugged. :twotu:
---------------------------------------------------------------------------------
Now if you get a backfire, you passed up compression stroke for cylinder one. Your 180* out. Proceed to step nine.
Step nine.
Pop the distributor cap, turn crank so the so that 10*BTC is lined up with the pointer, if rotor is pointing to the other side of the distributor 180* from black mark (cylinder 6), pull the distributor and repeat steps 7 and 8.
If rotor is pointing to number 1 (black mark), spin the crank once (so rotor is pointing to number 6 cylinder) and line up 10* BTC, pull the distributor, and repeat steps 7 and 8.
Good luck, this should get you going.
Photo's above, courtesy of Doomsmith :twotu:
Timing with a light.....
The timing light will have three connections to it. One goes to positive battery cable, one goes to negative battery cable, and the last will go onto the number one spark plug wire. Connect the timing light up. There are two types of timing lights. One has a dial, one does not. (VERY IMPORTANT----->) If your using a light that has a dial, make sure the dial is at 0 degrees. If it's not at 0*, then your timing will not be set right accordingly to these instructions. The dial is another way to read the balancer if going by a mark that's at 0* TDC. It's in more details and I'm not going to explain using the dial in this thread......yet (post 12).
------->Make sure all wires from timing light are away from the fan.<-------
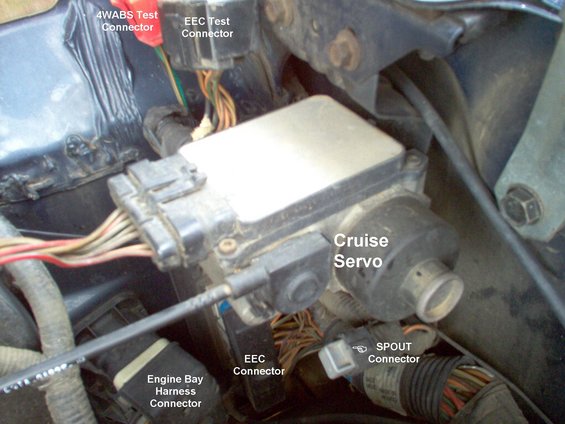
Now pull the spout connector or pull the vacuum line off the distributor and plug the line.
The spout will look like this for the ones that's near the distributor (84-91).
![Image]()
For the later models (92-96), it could be near the driver's side fender, as the ignition module was removed from the distributor. Here's a picture of this.
![Image]()
Or the vacuum line from the distributor
![Image]()
Start the motor.
The timing light will have a trigger. Aim the light towards the timing pointer, and see where the yellow/white mark on the 10* BTC that you made is at. It helps to have the truck partway in a garage to darken the surrounding light so you can see the timing marks every time the light flashes.
Next, if the mark is off by a little bit, turn the distributor so the mark lines up with the pointer. And tighten the distributor down tight. Recheck again after the distributor is tight. If the mark is lined up where you want it, replace the spout connector.
Sixlitre tuneup
If doing the sixlitre tune up, you'll want to make your mark on the 12* or 13* BTC instead of ten. I've made 12* and 14*BTC red so you can see where you'll need to line up the pointer for the sixlitre tune up. 13* BTC is between the red marks. ATC10||||0||||10||||20||||30BTC (Each "|" represents 2 degrees) Or just know that you'll want the 10*BTC mark to be just under the timing pointer (hidden).
NOTE: This method will work on most V8's, not just the 302 or 351. I've used this method on a buddy's 460, and had it running within minutes. Timing any motor should be done basically this way.
This is my routine and works every time.
These first steps are to be able to fire it up without a timing light. These first directions are for new motor installs, or if you've pulled the distributor and didn't mark the distributor before removing it.
This is step by step for a 302 or a 351
Step one.
Make sure auto trans is in Park and parking brake on, or if it's a manual trans in neutral and parking brake on (safety first). And leave the key removed from ignition as you don't want the engine to start while using this process.
Step two.
Make sure your timing marks are clean and can be read. These are located on the harmonic balancer. Clean them up with a wire brush or some sandpaper. Mark 10* BTDC with a white/yellow crayon. There will be two 10's showing, you want the red 10 below. The marks will look like:
ATC10||||0||||10||||20||||30BTC (Each "|" represents 2 degrees)
Step three.
Pull number one plug. It's the front plug on passenger side.
Step four. (This is where step one is IMPORTANT, if you don't believe me, go ask Garlic Bronco :doh0715
Using a screwdriver, bump the starter relay. When doing so, put a finger over the plug hole. As soon as you feel the big gush of air.......
Step five.
Locate your 10* BTC and this should be relatively close to your timing pointer. It might be before or slightly after. If it's before (spinning in clockwise direction), turn it so the 10*BTC lines up with the pointer like so. If it went past the timing pointer, then you can either turn it counter clockwise to meet the mark, or spin the crank so that the 10*BTC mark passes the timing pointer once (going clockwise) and stopping on the timing pointer on the second spin (clockwise).
This should be number 1 compression stroke.
Most people will recommend stabbing the distributor at 0*TDC. This thread is about how I do this, every time.
Notice something here. And this is why I do this at 10*BTC and not 0*TDC:
ATC10||||0||||10||||20||||30BTC<------notice 10*BTC is centered
ATC10||||0||||10||||20||||30BTC<------notice 0*TDC is not centered.
If stabbing the distributor at 0*TDC, and positioning the distributor so that the ignition module(if equipped) is pointing at a 45* (towards driver's headlight), then the stab wasn't centered. Positioning at 10*BTC, your centered on the timing marks, and centered on the stab of the distributor. This allows maximum EQUAL advance and retarding on the timing. Not more one way than the other which in turn can affect you getting it running on the first time.
Step six.
Grab the distributor and cap, and make a mark on the distributor plastic base for contact number one. This mark will be in the same spot as in this picture. Going by the screw in the picture, number one will be just to the left of the screw as seen by the black mark in the picture. Make a mark like so.
Step seven.
Time to drop the distributor in. Start the drop so the rotor is to the left of the black mark, ignition module at 45* angle. Now when the distributor gear marries the cam gear, the rotor will spin clockwise. You want to drop it in so the left tip of the rotor is about to make contact with the black mark like seen in the picture below when the distributor is fully seated. This will be real close to 10*BTC. And you'll be able to dial it in once running with a light. You also want to drop it in so that the ignition module (if equipped, if not, flat spot on distributor) is pointing at a 45 degree angle. Basically, aim it so it's pointing towards the driver's side head light. This will allow you maximum room to turn distributor both directions when setting final timing with a light. Then tighten the hold down bolt snug so the distributor turns but not to easily.
If you have the distributor fully seated into the block, and rotor positioned as shown in photo above (left tip rotor meets contact point of number 1) then it's time to wire it up. If distributor isn't fully seated, it's most likely because the oil pump shaft didn't slide into the distributor. If this happens, turn the crank with a 15/16 socket & ratchet and it'll drop in once the distributor turns. Won't take much of a turn. Then tighten the hold down bolt snug so the distributor turns but not too easily.
Step eight.
Replace cap and wire it up. 13726548 is the Windsor firing order. 15426378 is the older 302 and non HO motors firing order. This may vary due to cam changes. But will be one or the other.
Now verify firing order again. Fire it up. :thumbup
If it runs good, time it with a light with the spout unplugged. :twotu:
---------------------------------------------------------------------------------
Now if you get a backfire, you passed up compression stroke for cylinder one. Your 180* out. Proceed to step nine.
Step nine.
Pop the distributor cap, turn crank so the so that 10*BTC is lined up with the pointer, if rotor is pointing to the other side of the distributor 180* from black mark (cylinder 6), pull the distributor and repeat steps 7 and 8.
If rotor is pointing to number 1 (black mark), spin the crank once (so rotor is pointing to number 6 cylinder) and line up 10* BTC, pull the distributor, and repeat steps 7 and 8.
Good luck, this should get you going.
Photo's above, courtesy of Doomsmith :twotu:
Timing with a light.....
The timing light will have three connections to it. One goes to positive battery cable, one goes to negative battery cable, and the last will go onto the number one spark plug wire. Connect the timing light up. There are two types of timing lights. One has a dial, one does not. (VERY IMPORTANT----->) If your using a light that has a dial, make sure the dial is at 0 degrees. If it's not at 0*, then your timing will not be set right accordingly to these instructions. The dial is another way to read the balancer if going by a mark that's at 0* TDC. It's in more details and I'm not going to explain using the dial in this thread......yet (post 12).
------->Make sure all wires from timing light are away from the fan.<-------
Now pull the spout connector or pull the vacuum line off the distributor and plug the line.
The spout will look like this for the ones that's near the distributor (84-91).

For the later models (92-96), it could be near the driver's side fender, as the ignition module was removed from the distributor. Here's a picture of this.
Or the vacuum line from the distributor
Start the motor.
The timing light will have a trigger. Aim the light towards the timing pointer, and see where the yellow/white mark on the 10* BTC that you made is at. It helps to have the truck partway in a garage to darken the surrounding light so you can see the timing marks every time the light flashes.
Next, if the mark is off by a little bit, turn the distributor so the mark lines up with the pointer. And tighten the distributor down tight. Recheck again after the distributor is tight. If the mark is lined up where you want it, replace the spout connector.
Sixlitre tuneup
If doing the sixlitre tune up, you'll want to make your mark on the 12* or 13* BTC instead of ten. I've made 12* and 14*BTC red so you can see where you'll need to line up the pointer for the sixlitre tune up. 13* BTC is between the red marks. ATC10||||0||||10||||20||||30BTC (Each "|" represents 2 degrees) Or just know that you'll want the 10*BTC mark to be just under the timing pointer (hidden).
NOTE: This method will work on most V8's, not just the 302 or 351. I've used this method on a buddy's 460, and had it running within minutes. Timing any motor should be done basically this way.


