

1356 swap/refresh info:
4/15/06
Shadofax (The Juice)
There are lots of resources to review if you are looking for info. about the 1356 (electric or manual shift) or even the BW1345, so here are a few links right off the bat. I did most of my research from these links, as well as searching FSB (OF COURSE!) for prior rebuild threads (you should find several good ones with pics):
http://web.archive.org/web/20101224141021/http://www.broncolinks.com/index.php?index=70
miesk5 1356 links
¤
http://web.archive.org/web/20050224100710/http://www.medicine.wisc.edu/~mrm/bronco/1356shaft/
1356 Output Shaft Conversion
¤
See http://tbtrans.com/transfer_case.htm#ford_parts
Transfer case parts
¤
See http://www.fourwheeler.com/projectbuild/129_0406_red
1356 Manual Shift Rebuild in a 92 F150 (Project Fiery Redhead)
Source: by Ken B at Four Wheeler Magazine fourwheeler.com
¤
https://www.sonnax.com
Parts
¤
In the end, much of the info/added pics that were useful to me are combined at my supermotors site, so many pics not shown in this write-up can be found here:
http://www.supermotors.net/vehicles/registry/detail.php?id=628&s=30964#content
Here’s the basic premise of this write-up….got an electric BorgWarner 1356 transfer case causing you problems? Doesn’t matter if you think the problem is internal or external of the case. By swapping to a manual, all electrical problems can be eliminated. This leads to refreshing or rebuilding the manual 1356 case internals that you score for the swap, unless of course you buy one rebuilt or new (ebay has them rebuilt all the time, but they are still about $500). If you find a used one in good condition like I did, a rebuild and a fabulous learning experience can be yours for perhaps $120-350 depending on how much is needing replacement.
Rebuilding/refreshing a manual 1356 Transfer case
So let’s get started. Assuming you are wishing to convert from electric to manual, you need a donor. This is not absolute, but just about any Bronco, F150/250/350 between 1987-1996 will likely contain either an electric or manual 1356. I think it was even used in trucks a year or two after, then the BW4407 starts coming into play, and I know little about it. My manual case came from a ’95 Bronco just like mine, and the unit only had 80k to begin with. This is important since if the unit was even semi cared for, newer years/lesser miles will affect your parts total related to the refresh or worst case scenario, rebuild. It should also be noted that again a unit from a Bronco is easier since it already has the flange style rear output, whereas the trucks will have slip yoke and require additional parts with the flange, and proper output “nose” (the internal shaft is also different in length, and from what I have seen it also appears you would need to swap this too). In my case, since the unit was cared for, my write-up is more of a clean/refresh since I did not need to buy a new chain or new bearing kit.
Before unbuttoning the case, I want to go ahead and list out potential refresh/rebuild items. Here are the items I purchased (again look to the sources above on where to get the stuff):
• Seal Kit (Don’t buy the Jeff’s Bronco Graveyard one. It’s actually meant for a Truck as it has only 3 large input/output seals, and one is for the slip yoke style rear output, so you end up having to get one more seal that will work with the Bronco Flange rear output. All three large seals for the input and front and rear outputs are the exact same on the Bronco.
• Oil pump kit (this kit also included new shift fork pads).
That’s all I needed. You’ll need to look at your chain for slop, look at the forks for wear, look at the sprockets for wear, look at the planetary for wear/slop, from the 5th link above, check and see what kind of play you have in the shift lever that goes into the case (push/pull it). Too much play here will allow the shift fork to come out of the track within the case, causing a lot of problems with engagement/disengagement. A bearing kit is also a wise idea with higher mileage/fluid-abused Tcases.
Beyond this, there is one area that ALL cases broken into should have addressed, and that is wear at the case walls enclosing the oil pump locating arm. But first let’s break the case halves apart and do a quick tear down:
• Drain fluid, if not done already.
• Remove Front & Rear Yoke/Flange bolts. Torque on these is about 150ft lbs. so you’ll need to hold the case and use a big extension for leverage. The socket is a 1 ¼” 12pnt. I’ve heard that thick wall sockets don’t fit. Also note the washer and seal for reinstallation (new seals are included in the seal kit).
• Remove the 4 Torx bolts holding the rear tail shaft on. Remove the large C clip on the shaft. Note: All my torx case bolts (these 4 + the case bolts described next), once removed, had lots of magnesium shavings in the bolt holes. Messy when trying to keep things clean. Clean out the bolt holes before getting real clean with the case internals, and really, clean the case externally to save yourself some headache later.
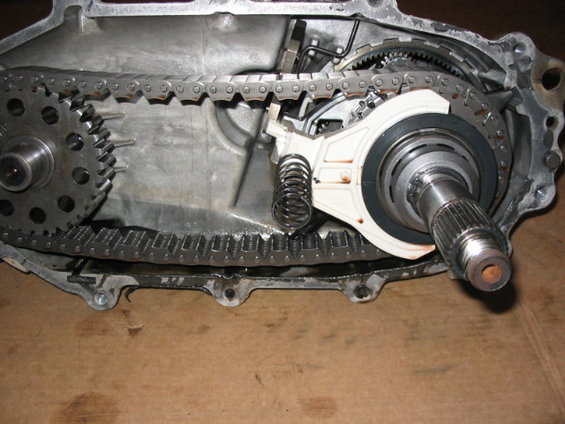
• Remove all the torx case bolts, and carefully separate the case halves. Note: there is a locating pin at each end, and notate the location of the spring for the shift fork within:
![Image]()
• Everything can now be viewed. To pull the chain, sprockets, shift fork arm, etc. there are three more C clips (do not get all these C clips mixed up, and do not damage them as most kits do not supply you with new ones). Of the three, 1 is over on the output to the front driveshaft along with a little washer, 1 is holding the rear output shaft sprocket/shift fork stuff on, and there is 1 final clip (very large) at the front of the Tcase inside the input shaft area (behind the seal). Removing this final one also will allow the whole planetary to slide out the back:
![Image]()
![Image]()
![Image]()
![Image]()
![Image]()
• The seals can be removed easily with a puller, shown in this pic (it's upper right in the pic just below the blue shop towels black handle, red grip, pic looking thing), along with other useful tools (a couple good screwdrivers and a pair of retaining ring pliers is mandatory). Do not damage the Tcase seal surfaces while trying to remove (thus the need to use a proper seal puller):
![Image]()
Ok, now that the case is apart, and you’ve got an idea of how it all goes together (it really is pretty simple inside), it’s time now to address the Oil Pump kit, the fix for the Oil pump locating arm, the shift fork pads, and now of course is when you’d put your new chain in, and any other rebuild parts I did not have to do (only other real items to consider here at this time would be pulling the old bearings and replacing, and planetary).
• Oil pump kit and the locator arm fix:
![Image]()
![Image]()
![Image]()
![Image]()
![Image]()
Oil pump kit reassembly should involve loctite red for the 4 bolts.
• The shift fork pads (these were part of my seal kit):
![Image]()
• Reassembly:
Reassemble parts as you took them off, again once you’ve studied the internals it’s not difficult.
Cleaning of case halves critical to reassembly, focus especially on a nice clean/smooth surface all around where the case halves meet.
Get about 4 cans of brake cleaner. Bearings (new ones or original) are critical not to have crud in them.
Be very careful how much and where the RTV goes on during reassembly of case halves. Too much RTV could ooze inside, come off and clog the oil pickup.
Be careful not to clog the port let for lubing the rear outlet bearing/Tcase plate that is attached with 4 bolts:
![Image]()
Install of manual case (in place of electric 1356) and external shift linkages:
I’ve done enough gabbering in the prior rebuild/refresh section, so this part is pretty easy with some guiding pictures, mainly to steer you to what you need with all the shift linkage:
• Once I had all the shifter pieces (rod, shifter assembly, bolts to attach to tranny, boot), I installed this first into the truck (see pics below).
• Taking out the electric 1356 requires removing both driveshafts, remove rear Tcase shift motor wiring harness, remove breather.
• You’ll have to support the tranny and drop the cross member, it’s fairly heavy so think this through.
• There are (6) ½” bolts that hold the Tcase to the tranny housing adapter. It will leak just a little once unbolted. There is very little room between the Tcase bolts on the passenger side and the stock exhaust. The bolts are not that tight since it’s all magnesium (torque on these is about 40 lb/ft., they had traces of red locktight on removal, so I used a little on reinstall. NOT the permanent, just red locktight high strength).
• You need a gasket (included in the seal kit, don’t damage it). It takes no sealant. Surfaces must be clean.
• Chock the wheels and place the tranny in Neutral, making install of the slip shaft easier while “clocking” the rebuilt manual Tcase into proper position.
Shifter parts:
E4OD shifter needed (this one came from a ’97 F250 with E4OD). Buying this, or the boot from the dealer is VERY expensive (several hundred total). Used this shifter was $65:
![Image]()
This is a better pic of the backing plate on the shifter:
![Image]()
E4OD boot/plastic piece, again used for $20. dealer wanted $75:
![Image]()
shifter assembly & backing plate ready to go down into the hole (you can see the two bolt holes in the side of the E4OD):
![Image]()
shifter rod & boot being located:
![Image]()
Installed (note that it’s WAY easier to do all this with the seat removed):
![Image]()
Underneath the truck looking rearward the E4OD shifter is kinda blocking the view, but right behind it is the 4WD shifter I just bolted to the tranny, and the linkage going back to the manual Tcase, now installed. Front driveshaft has not been installed yet.
The linkage rod from shifter assembly to the Tcase is specific for the E4OD, and one of the cheaper dealer scores (this way you get new grommets at either end), part #F2TZ-7B051-E, about $10
![Image]()
Interior shot of 4x4 and low range dash lights lit (as are the electric button lights). If you want your lights to work, Ford Part # F6TZ-14K067-AA is the short wiring assembly that goes from the manual tcase switch located on the front of the case just below the breather, over to the harness just above the E4OD tranny (it’s a bit spendy at the dealer, $34). There is a plug there with a cap, and this harness is plug and play. Eventually I will remove the pushbutton switches in the dash and put a blank black insert there ( about the same time I am going in to remove the ABS light which still is glowing on mine, can’t be seen in the pic since the auto shifter is in the way).
![Image]()
Final thoughts
I always thought the Tcase lay dormant until my 4wd was engaged. WRONG. The front driveshaft may not be moving, but the shaft internally connecting tranny to rear driveshaft is still constantly active, as is the planetary. This means that Tcase fluid maintenance is important. Fluid changes, as well as monitoring temps, is important.
Separate note, many folks have trouble with shifting into 4WD either due to lack of understanding of shift pattern and what gear to be in, or due to age of 4WD assembly and looseness (or lack of lubrication) in components such as the shifter linkage assembly (bolted under the truck usually to the tranny or extension). Lack of understanding of shift position leads one to start yanking, which in turn will break or damage the shifter linkage directly underneath, or worse yet, clock the Tcase internal shift arm sideways a little so the fork(s) fall out of position (see spacer recommendation above). Since the install, all has been perfect except that I seem to have tough engagement going from 4wd to Low range. It always sticks in neutral. Instead of trying to jam things, I’m letting the new parts settle in, and I’ve found that turning the truck off makes the shift in/out of low fairly easy (the factory owners manual suggests this).
4/15/06
Shadofax (The Juice)
There are lots of resources to review if you are looking for info. about the 1356 (electric or manual shift) or even the BW1345, so here are a few links right off the bat. I did most of my research from these links, as well as searching FSB (OF COURSE!) for prior rebuild threads (you should find several good ones with pics):
http://web.archive.org/web/20101224141021/http://www.broncolinks.com/index.php?index=70
miesk5 1356 links
¤
http://web.archive.org/web/20050224100710/http://www.medicine.wisc.edu/~mrm/bronco/1356shaft/
1356 Output Shaft Conversion
¤
See http://tbtrans.com/transfer_case.htm#ford_parts
Transfer case parts
¤
See http://www.fourwheeler.com/projectbuild/129_0406_red
1356 Manual Shift Rebuild in a 92 F150 (Project Fiery Redhead)
Source: by Ken B at Four Wheeler Magazine fourwheeler.com
¤
https://www.sonnax.com
Parts
¤
In the end, much of the info/added pics that were useful to me are combined at my supermotors site, so many pics not shown in this write-up can be found here:
http://www.supermotors.net/vehicles/registry/detail.php?id=628&s=30964#content
Here’s the basic premise of this write-up….got an electric BorgWarner 1356 transfer case causing you problems? Doesn’t matter if you think the problem is internal or external of the case. By swapping to a manual, all electrical problems can be eliminated. This leads to refreshing or rebuilding the manual 1356 case internals that you score for the swap, unless of course you buy one rebuilt or new (ebay has them rebuilt all the time, but they are still about $500). If you find a used one in good condition like I did, a rebuild and a fabulous learning experience can be yours for perhaps $120-350 depending on how much is needing replacement.
Rebuilding/refreshing a manual 1356 Transfer case
So let’s get started. Assuming you are wishing to convert from electric to manual, you need a donor. This is not absolute, but just about any Bronco, F150/250/350 between 1987-1996 will likely contain either an electric or manual 1356. I think it was even used in trucks a year or two after, then the BW4407 starts coming into play, and I know little about it. My manual case came from a ’95 Bronco just like mine, and the unit only had 80k to begin with. This is important since if the unit was even semi cared for, newer years/lesser miles will affect your parts total related to the refresh or worst case scenario, rebuild. It should also be noted that again a unit from a Bronco is easier since it already has the flange style rear output, whereas the trucks will have slip yoke and require additional parts with the flange, and proper output “nose” (the internal shaft is also different in length, and from what I have seen it also appears you would need to swap this too). In my case, since the unit was cared for, my write-up is more of a clean/refresh since I did not need to buy a new chain or new bearing kit.
Before unbuttoning the case, I want to go ahead and list out potential refresh/rebuild items. Here are the items I purchased (again look to the sources above on where to get the stuff):
• Seal Kit (Don’t buy the Jeff’s Bronco Graveyard one. It’s actually meant for a Truck as it has only 3 large input/output seals, and one is for the slip yoke style rear output, so you end up having to get one more seal that will work with the Bronco Flange rear output. All three large seals for the input and front and rear outputs are the exact same on the Bronco.
• Oil pump kit (this kit also included new shift fork pads).
That’s all I needed. You’ll need to look at your chain for slop, look at the forks for wear, look at the sprockets for wear, look at the planetary for wear/slop, from the 5th link above, check and see what kind of play you have in the shift lever that goes into the case (push/pull it). Too much play here will allow the shift fork to come out of the track within the case, causing a lot of problems with engagement/disengagement. A bearing kit is also a wise idea with higher mileage/fluid-abused Tcases.
Beyond this, there is one area that ALL cases broken into should have addressed, and that is wear at the case walls enclosing the oil pump locating arm. But first let’s break the case halves apart and do a quick tear down:
• Drain fluid, if not done already.
• Remove Front & Rear Yoke/Flange bolts. Torque on these is about 150ft lbs. so you’ll need to hold the case and use a big extension for leverage. The socket is a 1 ¼” 12pnt. I’ve heard that thick wall sockets don’t fit. Also note the washer and seal for reinstallation (new seals are included in the seal kit).
• Remove the 4 Torx bolts holding the rear tail shaft on. Remove the large C clip on the shaft. Note: All my torx case bolts (these 4 + the case bolts described next), once removed, had lots of magnesium shavings in the bolt holes. Messy when trying to keep things clean. Clean out the bolt holes before getting real clean with the case internals, and really, clean the case externally to save yourself some headache later.
• Remove all the torx case bolts, and carefully separate the case halves. Note: there is a locating pin at each end, and notate the location of the spring for the shift fork within:
• Everything can now be viewed. To pull the chain, sprockets, shift fork arm, etc. there are three more C clips (do not get all these C clips mixed up, and do not damage them as most kits do not supply you with new ones). Of the three, 1 is over on the output to the front driveshaft along with a little washer, 1 is holding the rear output shaft sprocket/shift fork stuff on, and there is 1 final clip (very large) at the front of the Tcase inside the input shaft area (behind the seal). Removing this final one also will allow the whole planetary to slide out the back:


• The seals can be removed easily with a puller, shown in this pic (it's upper right in the pic just below the blue shop towels black handle, red grip, pic looking thing), along with other useful tools (a couple good screwdrivers and a pair of retaining ring pliers is mandatory). Do not damage the Tcase seal surfaces while trying to remove (thus the need to use a proper seal puller):

Ok, now that the case is apart, and you’ve got an idea of how it all goes together (it really is pretty simple inside), it’s time now to address the Oil Pump kit, the fix for the Oil pump locating arm, the shift fork pads, and now of course is when you’d put your new chain in, and any other rebuild parts I did not have to do (only other real items to consider here at this time would be pulling the old bearings and replacing, and planetary).
• Oil pump kit and the locator arm fix:


Oil pump kit reassembly should involve loctite red for the 4 bolts.
• The shift fork pads (these were part of my seal kit):
• Reassembly:
Reassemble parts as you took them off, again once you’ve studied the internals it’s not difficult.
Cleaning of case halves critical to reassembly, focus especially on a nice clean/smooth surface all around where the case halves meet.
Get about 4 cans of brake cleaner. Bearings (new ones or original) are critical not to have crud in them.
Be very careful how much and where the RTV goes on during reassembly of case halves. Too much RTV could ooze inside, come off and clog the oil pickup.
Be careful not to clog the port let for lubing the rear outlet bearing/Tcase plate that is attached with 4 bolts:

Install of manual case (in place of electric 1356) and external shift linkages:
I’ve done enough gabbering in the prior rebuild/refresh section, so this part is pretty easy with some guiding pictures, mainly to steer you to what you need with all the shift linkage:
• Once I had all the shifter pieces (rod, shifter assembly, bolts to attach to tranny, boot), I installed this first into the truck (see pics below).
• Taking out the electric 1356 requires removing both driveshafts, remove rear Tcase shift motor wiring harness, remove breather.
• You’ll have to support the tranny and drop the cross member, it’s fairly heavy so think this through.
• There are (6) ½” bolts that hold the Tcase to the tranny housing adapter. It will leak just a little once unbolted. There is very little room between the Tcase bolts on the passenger side and the stock exhaust. The bolts are not that tight since it’s all magnesium (torque on these is about 40 lb/ft., they had traces of red locktight on removal, so I used a little on reinstall. NOT the permanent, just red locktight high strength).
• You need a gasket (included in the seal kit, don’t damage it). It takes no sealant. Surfaces must be clean.
• Chock the wheels and place the tranny in Neutral, making install of the slip shaft easier while “clocking” the rebuilt manual Tcase into proper position.
Shifter parts:
E4OD shifter needed (this one came from a ’97 F250 with E4OD). Buying this, or the boot from the dealer is VERY expensive (several hundred total). Used this shifter was $65:

This is a better pic of the backing plate on the shifter:

E4OD boot/plastic piece, again used for $20. dealer wanted $75:

shifter assembly & backing plate ready to go down into the hole (you can see the two bolt holes in the side of the E4OD):

shifter rod & boot being located:

Installed (note that it’s WAY easier to do all this with the seat removed):

Underneath the truck looking rearward the E4OD shifter is kinda blocking the view, but right behind it is the 4WD shifter I just bolted to the tranny, and the linkage going back to the manual Tcase, now installed. Front driveshaft has not been installed yet.
The linkage rod from shifter assembly to the Tcase is specific for the E4OD, and one of the cheaper dealer scores (this way you get new grommets at either end), part #F2TZ-7B051-E, about $10

Interior shot of 4x4 and low range dash lights lit (as are the electric button lights). If you want your lights to work, Ford Part # F6TZ-14K067-AA is the short wiring assembly that goes from the manual tcase switch located on the front of the case just below the breather, over to the harness just above the E4OD tranny (it’s a bit spendy at the dealer, $34). There is a plug there with a cap, and this harness is plug and play. Eventually I will remove the pushbutton switches in the dash and put a blank black insert there ( about the same time I am going in to remove the ABS light which still is glowing on mine, can’t be seen in the pic since the auto shifter is in the way).

Final thoughts
I always thought the Tcase lay dormant until my 4wd was engaged. WRONG. The front driveshaft may not be moving, but the shaft internally connecting tranny to rear driveshaft is still constantly active, as is the planetary. This means that Tcase fluid maintenance is important. Fluid changes, as well as monitoring temps, is important.
Separate note, many folks have trouble with shifting into 4WD either due to lack of understanding of shift pattern and what gear to be in, or due to age of 4WD assembly and looseness (or lack of lubrication) in components such as the shifter linkage assembly (bolted under the truck usually to the tranny or extension). Lack of understanding of shift position leads one to start yanking, which in turn will break or damage the shifter linkage directly underneath, or worse yet, clock the Tcase internal shift arm sideways a little so the fork(s) fall out of position (see spacer recommendation above). Since the install, all has been perfect except that I seem to have tough engagement going from 4wd to Low range. It always sticks in neutral. Instead of trying to jam things, I’m letting the new parts settle in, and I’ve found that turning the truck off makes the shift in/out of low fairly easy (the factory owners manual suggests this).
 opc1:
opc1:


