yo; This from the 96 Bronco Workshop Manual; same for your year;
Installation
Clean all the mating surfaces between the radius arm, axle and bracket prior to reassembly.
Position the forward washer and insulator on the rear of the radius arm and insert the radius arm into the frame bracket.
Position the rear spacer, insulator and washer on the radius arm and loosely install the attaching nut.
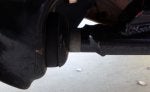
Position the radius arm, forward shock mount bracket (quad shock equipped vehicles) and front axle-to-radius arm bracket on the axle.
NOTE: New stud and bolt are required because of the adhesive coating on the original bolts. If new fasteners are not available, thoroughly clean the old fasteners and apply Loctite® No. 242 or equivalent to the threads of the fasteners.
Loosely install a new stud and bolt attaching the radius arm to the axle.
Tighten the radius arm rear attaching nut to 113-153 Nm (84-112 lb-ft).
Install and tighten the bracket-to-axle attachment screws to 34-46 Nm (26-33 lb-ft).
Tighten the radius arm to axle lower bolt to 434-461 Nm (320-340 lb-ft) and the upper stud type bolt to 326-351 Nm (240-260 lb-ft).
Position the spring lower seat with the locating tab positioned in the radius arm notch spring insulator.
Using Rotunda Hi-Lift Jack 164-R3508 or equivalent, raise axle until front coil spring (5310) is resting on lower spring seat.
Install lower spring retainer and nut. Tighten to 94-134 Nm (70-100 lb-ft).
NOTE: It is important that the attaching bolt be installed with the head toward the tire to maximize clearance to brake system components.
Position the front shock absorber to the lower bracket. Install the attaching bolt and nut and tighten to 71-100 Nm (52-74 lb-ft).
Connect the front stabilizer bar to the front stabilizer bar link (5K483), if equipped. Tighten nut to 71-100 Nm (52-74 lb-ft).
Install front disc brake calipers if removed. Inspect brake hydraulic lines for damage. Refer to Section 06-03.
Install the front wheel and tire assembly. Refer to Section 04-04.
Lower vehicle and, with the weight on the suspension, tighten axle pivot bushing bolt and nut to 163-203 Nm (120-150 lb-ft).
= -------------------- =============
and for posterity;
Removal
Refer to illustrations under Spring, Coil, F-150 and Bronco, in the Removal and Installation portion of this section.
Raise the vehicle and position safety stands under the frame side rails and a jack such as Rotunda Hi-Lift Jack 164-R3508 or equivalent under the axle.
Remove the front wheel and tire assembly. Refer to Section 04-04.
Disconnect the front stabilizer bar (5482) at the stabilizer link, if equipped.
Remove the shock absorber-to-lower bracket attaching bolt and nut and pull the front shock absorber (18124) free of the radius arm.
On vehicles equipped with quad front shock absorbers, remove the attaching nut and forward shock lower mount from the stud on the bracket.
Remove spring lower retainer attaching bolt from inside of the spring coil.
Loosen the axle pivot bolt.
Remove radius arm-to-frame bracket nut.
Remove the radius arm rear plastic spacer and insulator.
CAUTION: When lowering the axle, the axle must be supported on the jack throughout radius arm removal and installation, and must not be permitted to hang by the front brake hose (2078). If the length of the front brake hose is not sufficient to provide adequate clearance for removal and installation of the spring seat, the disc brake caliper (2B120) must be removed from the spindle. Refer to Section 06-03. After removal, the disc brake caliper must be placed on the frame or otherwise supported to prevent suspending the disc brake caliper from the caliper hose. These precautions are absolutely necessary to prevent serious damage to the tube portion of the caliper hose assembly.
Lower the axle, remove the lower spring retainer, insulator and spring seat and allow the axle to move forward.
Remove the two bolts attaching the front axle to radius arm bracket to axle tube.
Remove spring retainer, insulator, lower spring seat and stud.
Remove radius arm bracket-to-axle tube bolt.
Remove the front axle radius arm bracket.
Move the axle forward and remove the radius arm from the axle. Remove the radius arm from the frame bracket


 opc1: Hopefully, he'll do it in 4D (with motion).


