Bronco Forum - Full Size Ford Bronco Forum banner
41 - 60 of 81 Posts
Seattle FSB,
Where did you order your blue silicone tubing from?
I have will have to replace my vacuum lines as well.
How effective has you modifications has been so far?
Yo John,
Seattle wrote in Booba's Replace Plastic Vacuum Hoses with Rubber @ http://www.fullsizebronco.com/forum...om/forum/23-technical-write-ups/192382-replace-plastic-vacuum-hoses-rubber.html

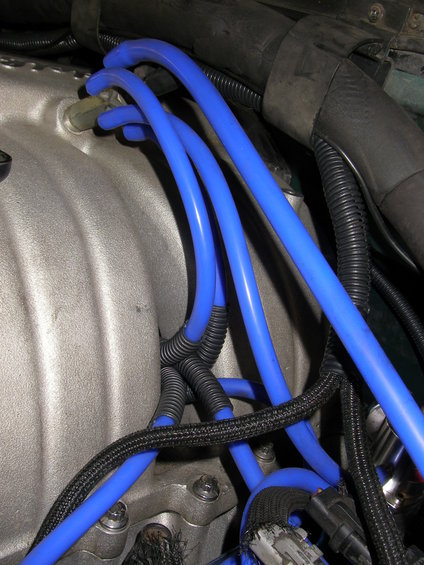
"Get the Silicone Boost/Vacuum Hose Engine Dress Up Kit and then an additional 10' of 4mm vacuum hose in the color of your choice. I used wire loom to protect the hose through the Intake Manifold, to the Diverter Valve and where it rubs on the Intake to the EVP. "
Silicone Boost/Vacuum Hose
 
is it necessary to have the EVP line running to the vacuum canister or can it be plugged directly into the tree? My tab/tad have been eliminated.
 
Negative.

The purpose of the Vacuum Reservoir is to retain a constant supply of vacuum to the emissions solenoids for consistent operation at all manifold vacuum levels. Vacuum levels constantly change due to accessory use and rpm level.

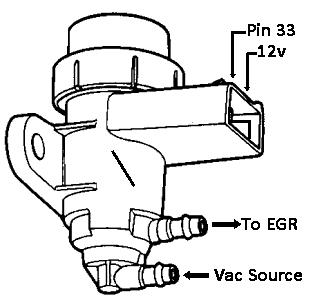
The EVP is a 5v electrical sensor that tells the EEC the EGR position. It does not operate on vacuum. The EGR is a vacuum operated valve which is commanded by varying metered vacuum from the EVR Solenoid. The EVR Solenoid receives a constant level of vacuum from the Vacuum Canister varying levels of vacuum to the EGR as commanded by the EEC, same as the TAB & TAD Solenoids which operate the TAB & TAD Valves.

To take emission solenoid vacuum directly off of the manifold tree will make a working secondary emissions system inconsistent and cause a CEL with associated DTCs.

Keep your EGR connected to the EVR, and the EVR connected to the Vacuum Canister. Due to the Vacuum Canister Check Valve, make sure your Manifold Vacuum and Solenoid Vacuum lines are on the correct side. The blank post is for orientation - the red manifold vacuum to the left and the black solenoid vacuum to the right with the Orientation Post to the bottom.

And be sure that the EVR top vacuum port goes to the EGR and the EVR bottom vacuum port goes to the vacuum canister. All emissions solenoids are actuators on top and canister vacuum supply on bottom. Unless you mount the solenoid upside down.


Image


Image


Image


Image
 
For anyone else wondering, here is my 1990 Emissions Vacuum Harness before the Silicone Vacuum Line upgrade.

  • RED line from Manifold Vacuum to Vacuum Reservoir
  • Black line from Vacuum Reservoir to TAB/TAD/EVR Solenoids
  • Pink TAB Solenoid line out to TAB Valve
  • Yellow TAD Solenoid line out to TAD Valve
  • Green EVR Solenoid line out to EGR


Image
 
Is the "main" side of the vacuum can supposed to hold vacuum?
Mine doesn't. It takes forever to build up just one HG and it falls off rapidly.

The "A.C" side holds vacuum just fine.

Image
 
Found this on ford-trucks:

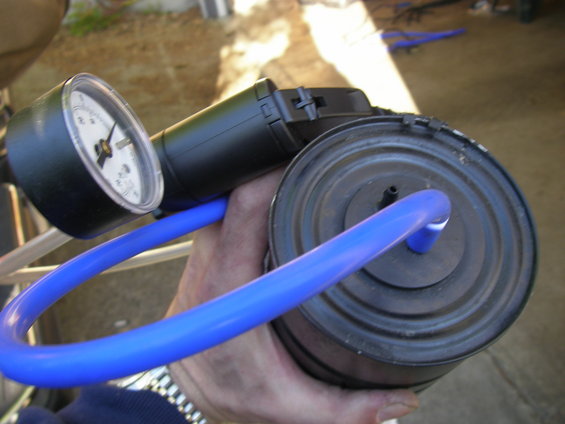
It only takes 1 test to check a reservoir: apply vacuum with a gauged pump to the nipple for the black line (leave the other open). If it builds up vacuum & holds, the reservoir is good. Otherwise, find a plastic replacement that passes the same test.


I guess mine is fine because I pumped 5 HG into it and it was a VERY slow drop in pressure afterwards that may have been my tester fitting.
 
I made an easy to understand diagram on an excel spreadsheet if anyone needs that may help as well. anyone needs it let me know

Booba, why are you running your plug wires like that ? I am guessing 7 and 8 ? does that hlep to avoid crossfire

Riggs, would you kind enough to email me the vacuum hose upgrade speadsheet please. Am having a hard time getting where lines go. You can email me at DiazR500500@gmail.com

thank you
 
shoot guys , sorry I just saw the requests for the excel spreadsheet . I do not have that anymore ( old computer)

it didnt help much anyways , it was redundant as this thread has alot of good info.
 
  • Like
Reactions: miesk5
This should cover most 87-96 V8s (302\351); for the I6s (300)s the solenoids are in the same general
area, as well as the valves. You can use this article as a basis to replace yours, just keep in mind it
will be slightly different.

Parts you'll need:
All available from a local autoparts store (except one)
Approximately 20' of vacuum hose (5\32")
2 Vacuum T's
Patience

To get started, I'll explain what the point of it all is. The EEC (Electronic Engine Control or computer)
uses electronic solenoids to send vacuum to valves (in this case, three valves: the EGR, the TAB
(next to the SMOG pump), and the TAD (behind the upper intake plenum). The EEC sends a
signal to the solenoid and it "opens" the valve to allow the engine vacuum through.
The easiest way to understand this is with the EGR.

At idle, the EGR is normally closed; but when you get to highway speeds, the EEC wants the EGR
to open. The EEC sends the signal to "open" the valve to let the vacuum through and the
vacuum opens the EGR. For a more in depth description of the TAB\TAD systems,
see this post (Thanks WuTang).

The TAB valve works the same way, it either directs the air pumped from the smog pump onward to
the TAD valve (we'll get there) or out to nowhere (not used). When the TAB valve directs the air
onto the TAD valve, the TAD valve either directs the air from the smog pump down into the catalytic
converter, or into the back of the engine. Here's a pic:

Image


You can see the coil, the TAD, TAB, and EVR solenoids (EVR controls the EGR). You can see
the yellow line coming from the TAD solenoid, the pink line coming from the TAB solenoid, and the line
coming from the EVR is green; can't see it, but it's there. What you can't see (but when you look
at your truck you can) are the vacuum hoses that plug into the bottom of the solenoids. This is
where the vacuum is supplied to the solenoids. On the EVR(EGR) solenoid, it goes straight to the
vacuum tree (vacuum hook-up on the intake manifold). On the EVR(EGR), the top (green)
hose goes straight to the EGR valve, and the Bottom (red) hose goes straight to the intake manifold.

The TAB\TAD valves are a little different, but not much. The only difference is that the red line
(yes, the exact same one that goes to the bottom of the EVR\EGR solenoid) goes all the way over
to the vacuum canister on the fender, the vacuum canister stores vacuum for these valves
(TAB, TAD). Then there is a black vacuum line coming out of the vacuum canister next to the
red line that goes all the way back over to the bottom ports of the TAD\TAB solenoids.
From the top of the TAB solenoid a pink hose is run to the valve right next to the smog pump
(I'll show a pic after this rambling paragraph). From the TAD, there's a yellow hose run to
the TAD valve behind the intake manifold.

Here's a pic of a motor that's pulled, just so you can see where the valves are and such;
but you don't have to pull the motor, lord knows I didn't.
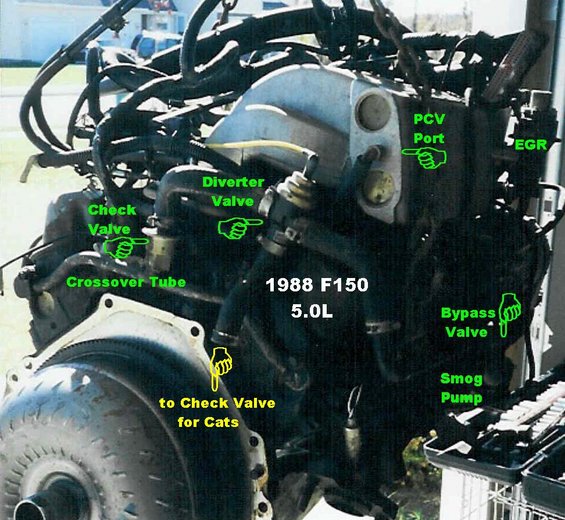
Image


You can see the yellow line going to the "diverter" valve (TAD). You can also see
the “bypass” valve (TAB) (you can't see the vacuum line going there, but when you
look at it on your truck you'll see it), plus the EGR and all that other stuff.

Ok, so now that we have an idea of what goes on, let's get started. To avoid confusion,
only run one hose at a time. We need to replace\rerun the red vacuum line, so take a
piece of vacuum hose and run it from the vacuum tree on the intake manifold to
the vacuum canister.

Run it around the back of the engine (I ran it on top of the passenger side valve cover,
under the upper intake plenum). Plug the hose into the vacuum canister where the red
hose plugged into. Here's an overhead pic of how I have my vacuum lines run, you can
also use this to see how to run new (rubber) lines to the FPR (Fuel Pressure Regulator)
and the MAP (Manifold Absolute Pressure) Sensor. In all my pics I tried to use the most
sophisticated graphic design program known to man (Paint) to help. I tried to keep the
coloring the same as the original colors, with the exception of the MAP sensor and FPR:
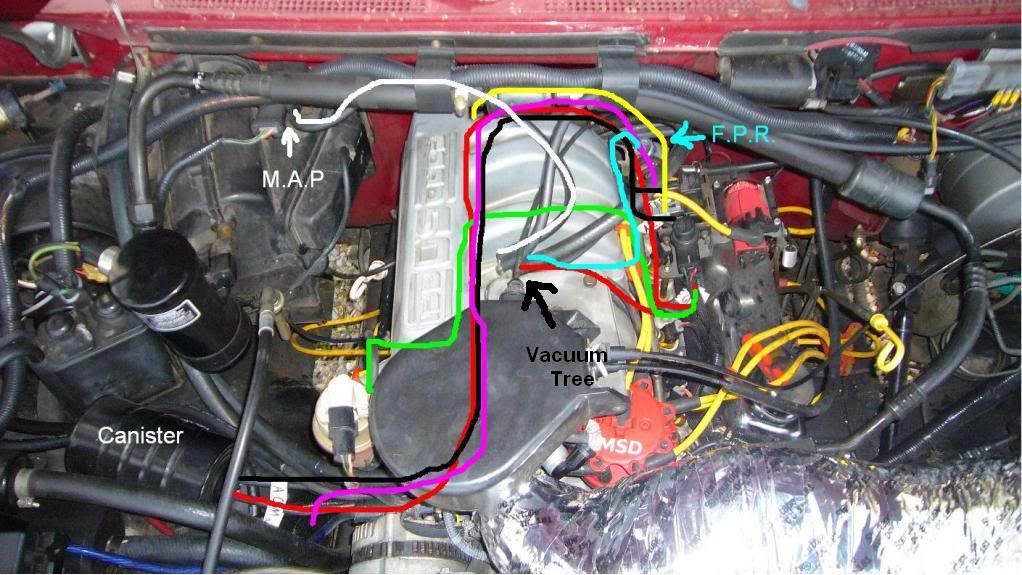
Image


Go back to the driver side of the intake, where the solenoids are, and cut the vacuum line
you just ran so you can put a "T" on it and run a very short vacuum line to the bottom of
the EVR\EGR solenoid:
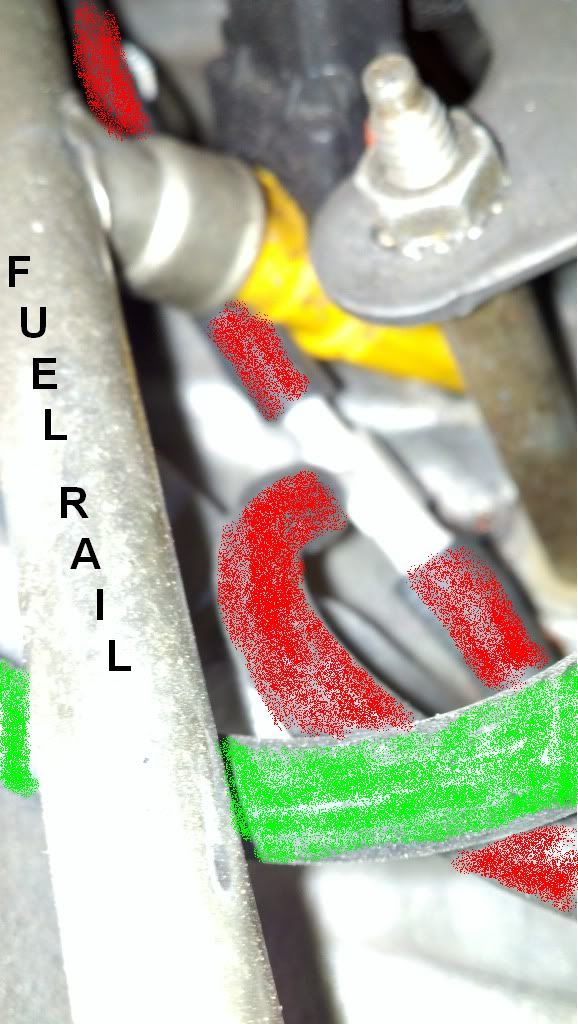
Image


From the T you connect a short vacuum hose to the bottom of the EVR solenoid, Pic:
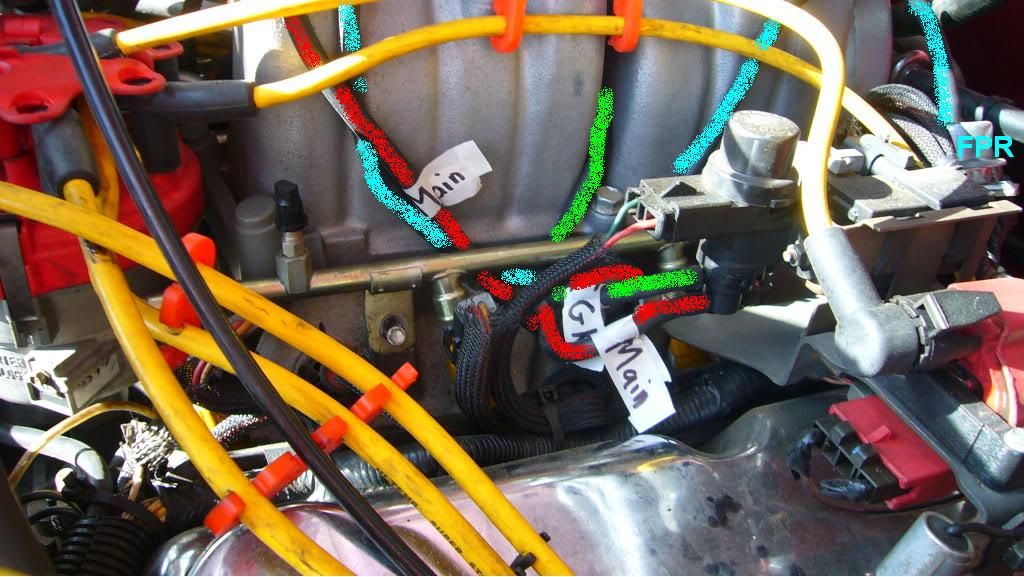
Image


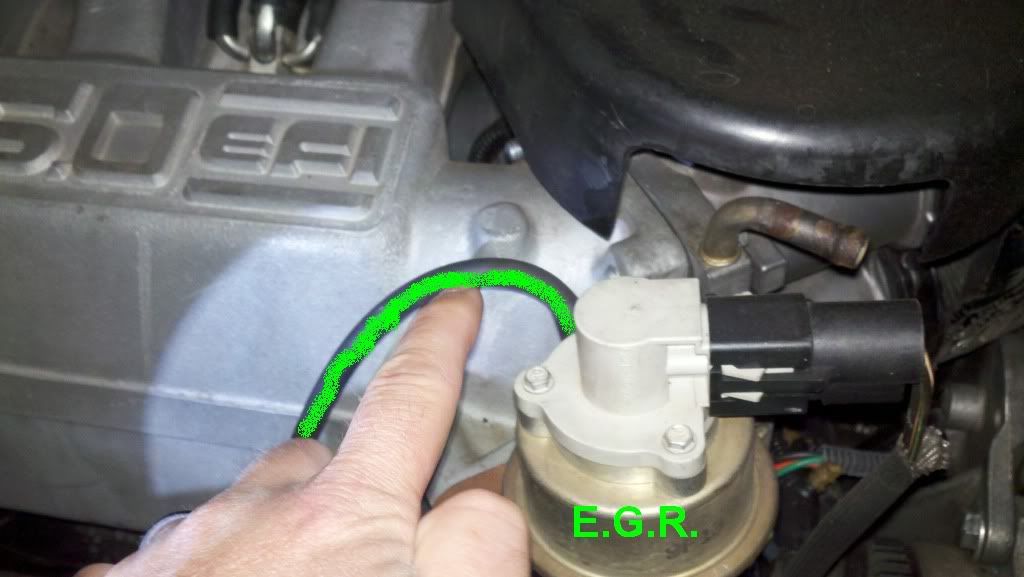
Then run a vacuum hose from the top of the EVR solenoid where the green line used to be
(see pic above) to your EGR valve. I ran the hose through the hole in the middle of the
intake plenum, and then ran it up to the EGR:
Image


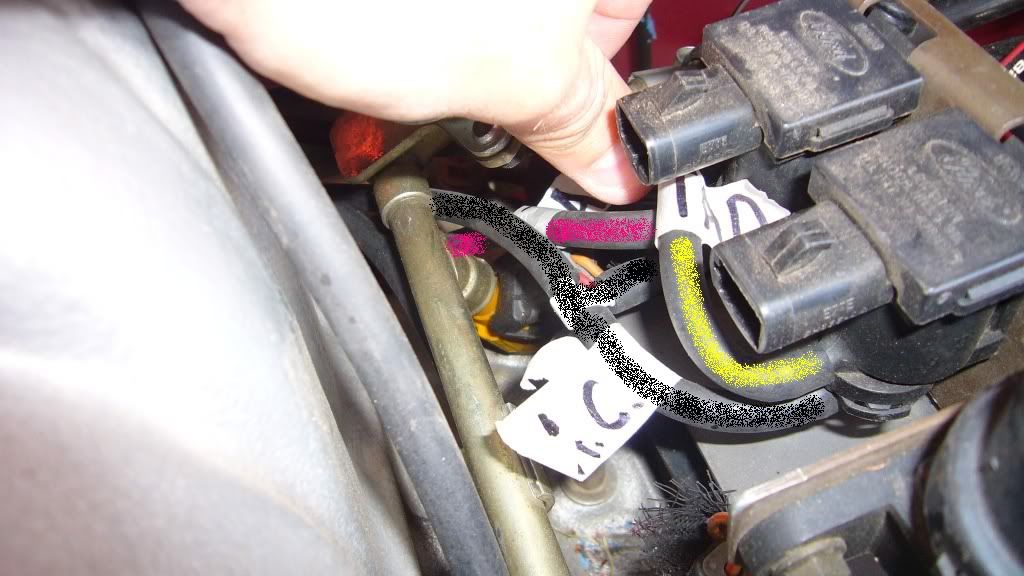
Now go back to the vacuum canister, and run a vacuum hose from the OTHER plug on the
canister(formerly black line) to the bottom port on the 2 solenoids for TAB\TAD. You will
need another "T" so that you can split the hose into 2 hoses, one for each solenoid.
Kind of hard to see in this pic, you can see the white tip of the T, but it'll make sense
when your doing it:
Image


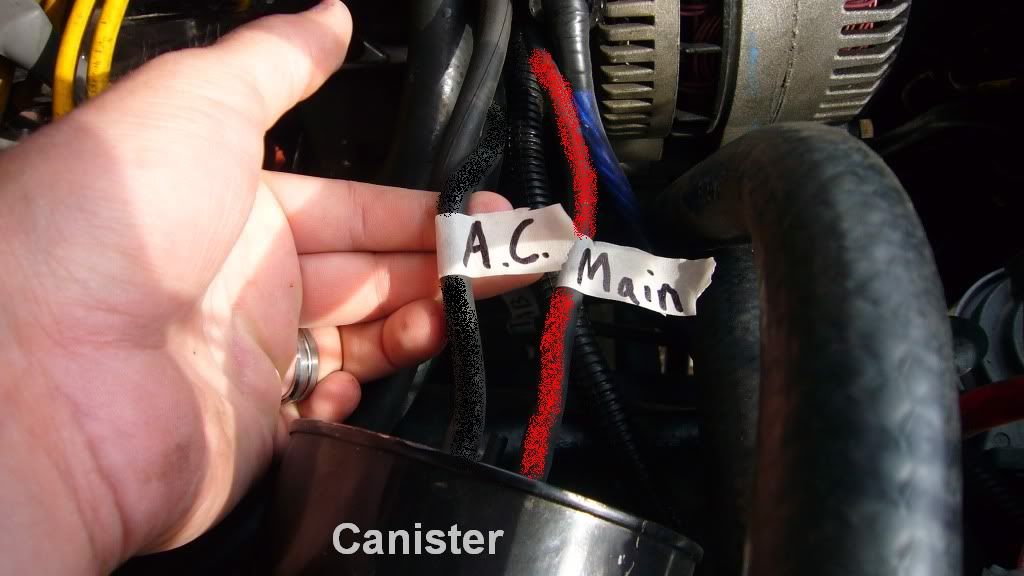
2 hoses coming from the vacuum canister (A.C. stands for After Canister):
Image


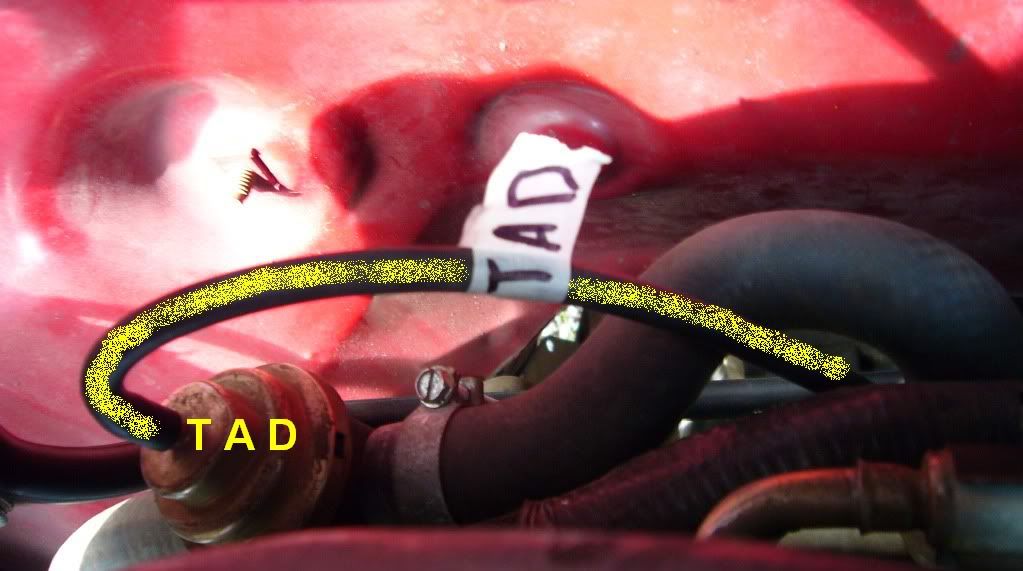
After that, run a hose from the top port on the TAD (front of the 2 solenoids) to the diverter
valve behind the intake plenum (originally it was a yellow hose). Here's a pic, I literally
set my camera on the intake plenum, and took a picture behind it; so it's kind of close up:
Image


Almost done!
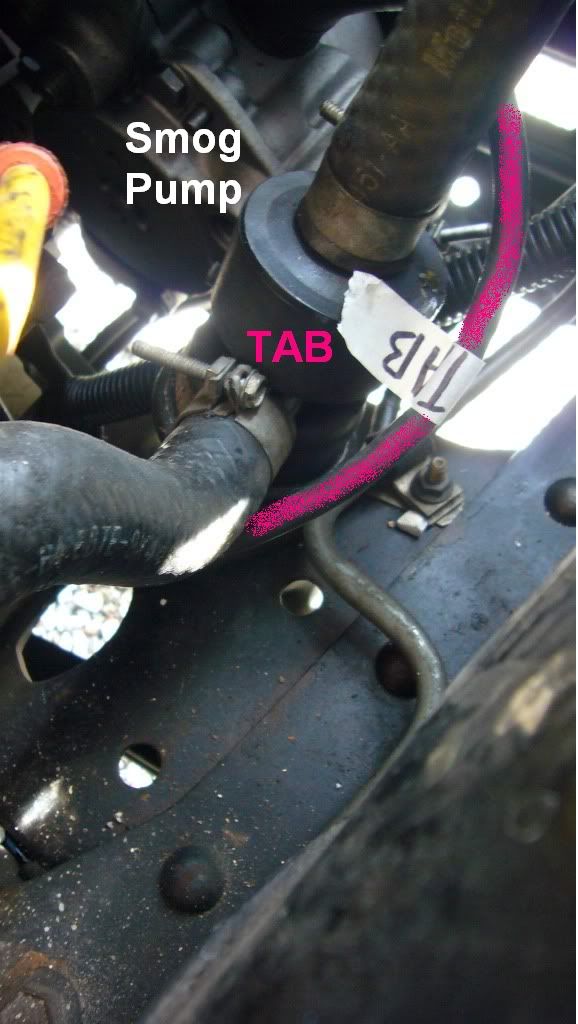
All that's left is to run a vacuum hose from the top port of the rear-most solenoid (TAB)
to the valve that’s right by the smog pump. This was the hardest part for me, but I have
fat fingers, and truthfully it wasn't that bad; just annoying. Here's a pic, it might be easier
to plug the hose in from under the truck, but I was able to do it from the top.
Image


Image


Here's the solenoids with the TAD, TAB, and the A.C. (After Canister) line:
Image


That’s it for the SMOG stuff, but if you want to completely do away with all the plastic crap,
you can run a new hose from the vacuum tree straight to the FPR (fuel pressure regulator),
as well as a vacuum hose straight from the vacuum tree to the MAP sensor.
Here's some pics of the whole set up, you can see the hoses going to the solenoids:

Image


If you change out the FPR and the MAP hoses, then you can literally take out the plastic
crap so it doesn't clutter up your engine bay, like I did:


That's pretty much it, now you have a rubber vacuum system!

Thanks goes to WuTang for proofreading\ideas, and thanks to Miesk5 for clarification on what
years this applies to and his never-ending knowledge!
Hi, my EGR has been eliminated. Is that OK
 
This should cover most 87-96 V8s (302\351); for the I6s (300)s the solenoids are in the same general
area, as well as the valves. You can use this article as a basis to replace yours, just keep in mind it
will be slightly different.

Parts you'll need:
All available from a local autoparts store (except one)
Approximately 20' of vacuum hose (5\32")
2 Vacuum T's
Patience

To get started, I'll explain what the point of it all is. The EEC (Electronic Engine Control or computer)
uses electronic solenoids to send vacuum to valves (in this case, three valves: the EGR, the TAB
(next to the SMOG pump), and the TAD (behind the upper intake plenum). The EEC sends a
signal to the solenoid and it "opens" the valve to allow the engine vacuum through.
The easiest way to understand this is with the EGR.

At idle, the EGR is normally closed; but when you get to highway speeds, the EEC wants the EGR
to open. The EEC sends the signal to "open" the valve to let the vacuum through and the
vacuum opens the EGR. For a more in depth description of the TAB\TAD systems,
see this post (Thanks WuTang).

The TAB valve works the same way, it either directs the air pumped from the smog pump onward to
the TAD valve (we'll get there) or out to nowhere (not used). When the TAB valve directs the air
onto the TAD valve, the TAD valve either directs the air from the smog pump down into the catalytic
converter, or into the back of the engine. Here's a pic:

Image


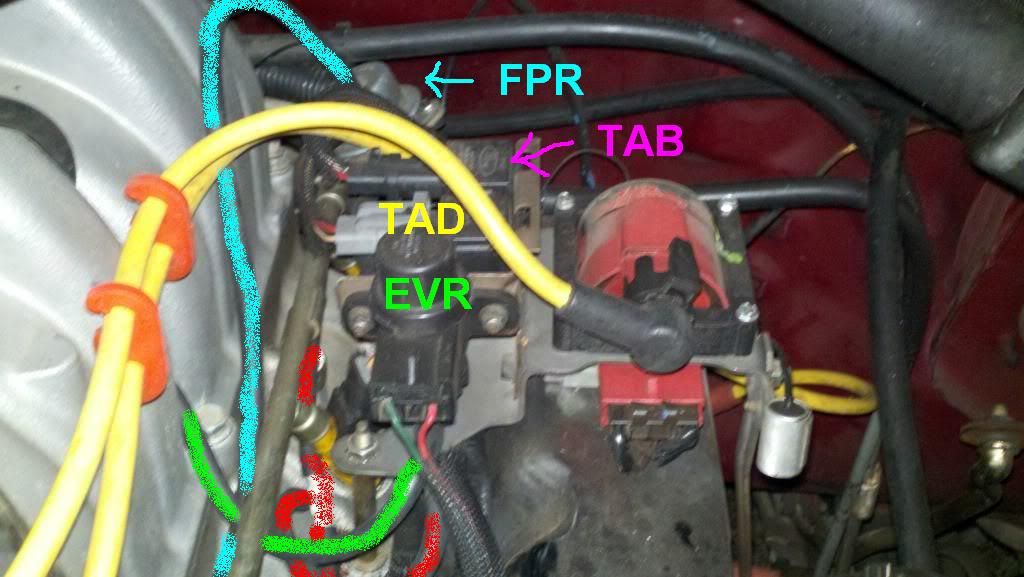
You can see the coil, the TAD, TAB, and EVR solenoids (EVR controls the EGR). You can see
the yellow line coming from the TAD solenoid, the pink line coming from the TAB solenoid, and the line
coming from the EVR is green; can't see it, but it's there. What you can't see (but when you look
at your truck you can) are the vacuum hoses that plug into the bottom of the solenoids. This is
where the vacuum is supplied to the solenoids. On the EVR(EGR) solenoid, it goes straight to the
vacuum tree (vacuum hook-up on the intake manifold). On the EVR(EGR), the top (green)
hose goes straight to the EGR valve, and the Bottom (red) hose goes straight to the intake manifold.

The TAB\TAD valves are a little different, but not much. The only difference is that the red line
(yes, the exact same one that goes to the bottom of the EVR\EGR solenoid) goes all the way over
to the vacuum canister on the fender, the vacuum canister stores vacuum for these valves
(TAB, TAD). Then there is a black vacuum line coming out of the vacuum canister next to the
red line that goes all the way back over to the bottom ports of the TAD\TAB solenoids.
From the top of the TAB solenoid a pink hose is run to the valve right next to the smog pump
(I'll show a pic after this rambling paragraph). From the TAD, there's a yellow hose run to
the TAD valve behind the intake manifold.

Here's a pic of a motor that's pulled, just so you can see where the valves are and such;
but you don't have to pull the motor, lord knows I didn't.

Image


You can see the yellow line going to the "diverter" valve (TAD). You can also see
the “bypass” valve (TAB) (you can't see the vacuum line going there, but when you
look at it on your truck you'll see it), plus the EGR and all that other stuff.

Ok, so now that we have an idea of what goes on, let's get started. To avoid confusion,
only run one hose at a time. We need to replace\rerun the red vacuum line, so take a
piece of vacuum hose and run it from the vacuum tree on the intake manifold to
the vacuum canister.

Run it around the back of the engine (I ran it on top of the passenger side valve cover,
under the upper intake plenum). Plug the hose into the vacuum canister where the red
hose plugged into. Here's an overhead pic of how I have my vacuum lines run, you can
also use this to see how to run new (rubber) lines to the FPR (Fuel Pressure Regulator)
and the MAP (Manifold Absolute Pressure) Sensor. In all my pics I tried to use the most
sophisticated graphic design program known to man (Paint) to help. I tried to keep the
coloring the same as the original colors, with the exception of the MAP sensor and FPR:

Image


Go back to the driver side of the intake, where the solenoids are, and cut the vacuum line
you just ran so you can put a "T" on it and run a very short vacuum line to the bottom of
the EVR\EGR solenoid:

Image


From the T you connect a short vacuum hose to the bottom of the EVR solenoid, Pic:

Image


Then run a vacuum hose from the top of the EVR solenoid where the green line used to be
(see pic above) to your EGR valve. I ran the hose through the hole in the middle of the
intake plenum, and then ran it up to the EGR:

Image


Now go back to the vacuum canister, and run a vacuum hose from the OTHER plug on the
canister(formerly black line) to the bottom port on the 2 solenoids for TAB\TAD. You will
need another "T" so that you can split the hose into 2 hoses, one for each solenoid.
Kind of hard to see in this pic, you can see the white tip of the T, but it'll make sense
when your doing it:

Image


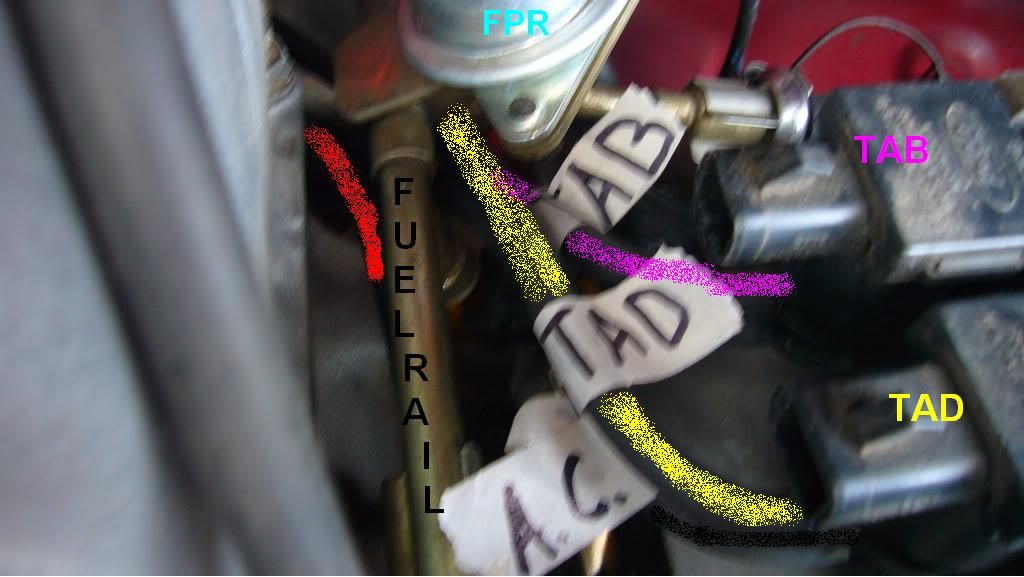
2 hoses coming from the vacuum canister (A.C. stands for After Canister):

Image


After that, run a hose from the top port on the TAD (front of the 2 solenoids) to the diverter
valve behind the intake plenum (originally it was a yellow hose). Here's a pic, I literally
set my camera on the intake plenum, and took a picture behind it; so it's kind of close up:

Image


Almost done!
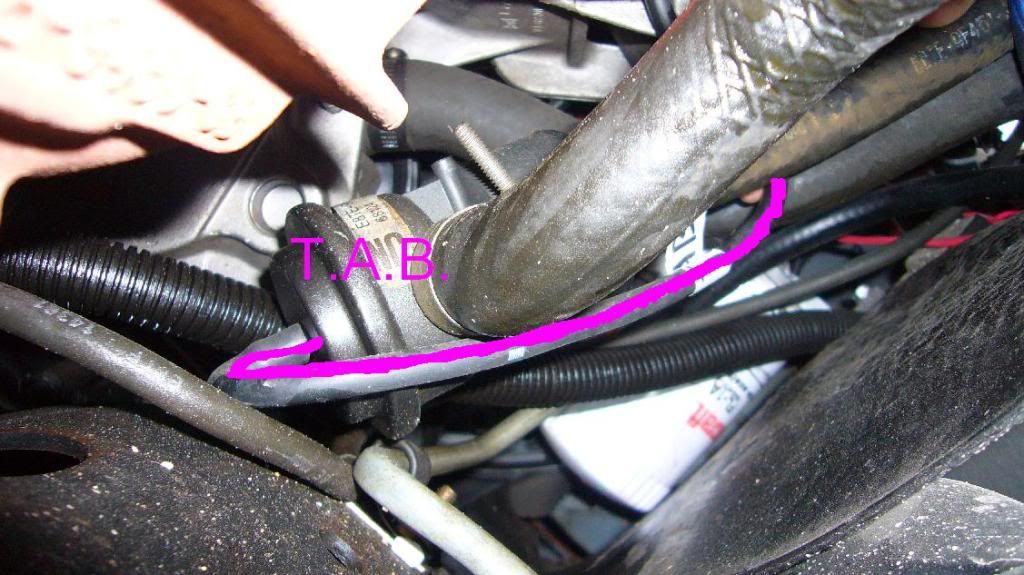
All that's left is to run a vacuum hose from the top port of the rear-most solenoid (TAB)
to the valve that’s right by the smog pump. This was the hardest part for me, but I have
fat fingers, and truthfully it wasn't that bad; just annoying. Here's a pic, it might be easier
to plug the hose in from under the truck, but I was able to do it from the top.
Image


Image


Here's the solenoids with the TAD, TAB, and the A.C. (After Canister) line:
Image


That’s it for the SMOG stuff, but if you want to completely do away with all the plastic crap,
you can run a new hose from the vacuum tree straight to the FPR (fuel pressure regulator),
as well as a vacuum hose straight from the vacuum tree to the MAP sensor.
Here's some pics of the whole set up, you can see the hoses going to the solenoids:
Image


If you change out the FPR and the MAP hoses, then you can literally take out the plastic
crap so it doesn't clutter up your engine bay, like I did:


That's pretty much it, now you have a rubber vacuum system!

Thanks goes to WuTang for proofreading\ideas, and thanks to Miesk5 for clarification on what
years this applies to and his never-ending knowledge!
Hi, if the EGR valve, smog pump, diverter valve have been removed from my truck, can I also delete the TAB, TAD, EVR VALVES
 
Yo joeluis736,
Yes, delete all, but read;
"Remove the EGR for a cleaner look and cooler intake air. The EGR system adds heat and carbon deposits to the intake manifold. EGR Valve Position Sensor Eliminators send a 0.50volt CLOSED EGR signal to the computer. The computer then knows the EGR is permanently closed. Keeps the annoying CHECK ENGINE light OFF, and more importantly keeps the engine running smoothly. Guaranteed to work on any 1986-93 5.0L Mustang! Also works on most 1986-95 Ford that uses the Light Gray EGR valve position sensor; which has a closed reading of 0.24 – 0.67 volts. Without this the computer will assume the EGR is stuck open when removed, causing a rough running engine. We can't guarantee these will work on every 1986-95 Ford, but the only other option is a custom chip for the computer, which typically costs $350 or more. While the only option for 1996 and newer Fords is a custom tuned chip for the computer."

Disconnect EGR Valve Position sensor (EVP), and inspect the harness connector. Make sure it’s free of corrosion and still has dielectric grease on the terminals.
Plug the Eliminator into the EGR Valve Position sensor (EVP) harness connector.
Zip tie the eliminator to the engine to protect it from vibration.
This product only eliminates the EGR electrically. Please take the time to remove and cap off vacuum lines. If you are leaving the EGR valve on the intake confirm that it is fully closed. Aleaky EGR will cause more engine problems. It’s best to remove the EGR spacer, or put a block off plate over the opening.
When performing computer Self-Test after installing this kit it is normal to get code:
33 / 332 EGR valve opening not detected.
The computer is acknowledging that the EGR is permanently closed. This is your desired result. However if you get the following codes:
31 / 327 - EVP circuit failed below the closed EGR limit of 0.24 volts
32 / 328 - EVP circuit failed below the closed EGR limit of 0.24 volts
34 / 334 - EVP circuit failed above the closed EGR limit of 0.67 volts
35 / 337 - EVP circuit failed above the open EGR limit of 4.81 volts
Check your connection again; make sure there is no resistance in the harness.
NOTE: This device is not intended for pollution controlled vehicles. Local, State, and Federal laws may prohibit the removal or disabling any emission control device on any emission applicable vehicle. in Eliminator Installation Manual Source: by Ryan M (Fireguy50) Wayback Machine

Removal; "...What you need to do is electrically plug in the TAB and TAD solenoids but remove the vacuum lines, then all the air injection plumbing and valves can be removed and the heads plugged. The EGR is a seperate system from the Thermactor and the computer treats it very differently, it also helps increase milage and power so it's a good idea to keep it anyway. If you have the DPFE system there is no way to bypass it without the computer knowing and throwing a code so you may as well keep it intact. you'll get codes if you remove the solenoids, the easiest way to avoid this is to just leave them plugged in. The TAB and TAD you could fake out pretty easy, but even the old EGR system can't be faked because the computer both commands valve movement and watches for feedback to confirm it happened, so a dummy resistor won't cut it.
Source: by Conanski

Ryan also sold;
Actuator Eliminator Resistor $2.00 each
75 ohm 3watt Resistors can also be used to eliminate the EVR, CANP, TAB & TAD solenoids.

--
http://web.archive.org/web/20070221131457im_/http://rjminjectiontech.com/images/egr-plate.jpg
EGR Eliminator Plate $40.00

--------
EGR Eliminator 2 $20.00
Comes with terminals ready to be inserted into the harness near the computer. Can be hidden near the computer, for a cleaner look!
181978

NOTE: This device is not intended for pollution controlled vehicles. Local, State, and Federal laws may prohibit the removal or disabling any emission control device such as the EGR system.
========[
EGR Do it yourself MIL Eliminator
You will need to go to radio shack and purchase 3 resistors, two 3.9k ohm 1/2 watt resistor& one 390 ohm k1/2 watt resistor. See attached diagram
181976

181977
 
I’m a little late to this but Im experiencing a constant red flame out the exhaust at idle once it gets about up to running temp and every few seconds a back fire with a blue flame… I just converted all my vacuum to rubber hose and this is all I’ve touched and messed with since it’s started acting up on me and started shooting flames and input or knowledge would be appreciated… thanks
My vehicle in question… 89 Bronco 5.0
 
Yo Pablo,
Welcome!

Timing could be retarded. There could be a lean mixture.
Inspect for broken vacuum lines, and be sure your fuel pressure regulator isn't ruptured; pull the vacuum line off of it, and make sure fuel isn't present or any aroma thereof in that line.
You may also have a clogged catalytic converter.
182386

See my Vacuum leak test in post #11@ See my Vacuum leak test in post #11

Try a Self Test for Diagnostic Trouble Codes by my pal, BroncoJoe19 @ Code Reader.....

PCM stores the Self-Test program in permanent memory. When activated, Self-Test checks the EEC system by testing memory integrity and processing capability, and verifies that various sensors and actuators are connected and operating properly.

Check all engine vacuum hoses for damage, leaks, cracks, blockage, proper routing, etc.

The engine temperature must be greater than 50° F for the Key On Engine Off (KOEO) Self-Test and greater than 180° F for the Key On Engine Running (KOER) Self-Test. Run it around to heat the engine up and shift thru all gears including Reverse. Make sure A/C is off and transmission is in Park (automatic); or in Neutral for a Manual and; release clutch. Then turn off engine, all accessories/lights (close driver's door) , etc.

Do KOEO test First. Post Code(s) here according to KOEO and KOER.

A helper can assist you by counting the codes. Some use their smart phones to record them.

BEWARE OF FAN, BELTS, PULLEYS, HOT HOSES, IGNITION HIGH TENSION WIRES, AND ENGINE COMPONENTSâš 

Or ask local mom and dad parts stores if they will test it for you.

Or purchase a coder reader such as Equus 3145 Innova OBD I Code Reader for Ford EEC IV Engines at Walmart & most parts stores.
â—Ź
Here are the 1989 Ford Bronco EVTM, Emissions (yellowish/red book cover) & Pre-Delivery Manuals, Partial via mrnewland1 in Google Drive @
1989 Service manual - Google Drive
Slow scrolling, so download for faster viewing and to see the table of contents, the search feature, etc.

Haynes Red Manual for 80-95 Bronco & F Series @ Hanes guide 80-96 bko f series.pdf found by BroncMom

1989 Ford Bronco Dealer Brochure

1989 Bronco Lubricant Specifications by Ford via Gary

For any Bronco questions, it's better to post each seperately in Noobie Bronco Tech Questions. Flame free zone. This will get more attention and you can build up your post count to get into other sections such as Bronco and Ford Parts/Accessories (50 posts required to participate due to scammers who preyed on our members).

See How to add your Signature @ Bronco Forum - Full Size Ford Bronco Forum by BigBlue 94

Forum FAQs includes for example, Hot to Use Search. How To Save (Bookmark) Threads Or Posts, How To Upload Images To Posts and more tips!

➡ Baba Looey's Favorite FSB Links (lots and lots of tech links) includes such as, How do I fix my back window?

Please find time to participate and Vote in our next Full-Size Bronco of the Month Contest and later in the year, Full-Size of the Year Contest @ Voting
You will get ideas by those competing.
Prizes are awarded to Winner!; a full spread in Bronco Driver Magazine is the top prize, in addition to a years subscription, once the article is submitted; also, a years worth of premium FSB membership.
Al
 
Thanks Booba5185! You motivated me to replace my old plastic vacuum lines with new Silicone lines and eliminate those pesky vacuum leaks! Your thread made it easy.

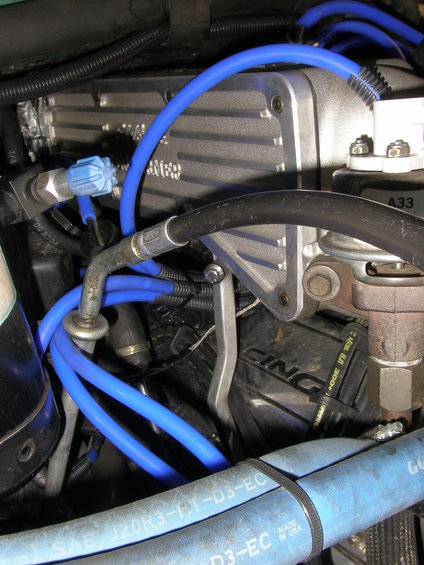
Replaced the Emmisions Solenoid lines...
Image


Through the Edelbrock Intake Manifold...
Image


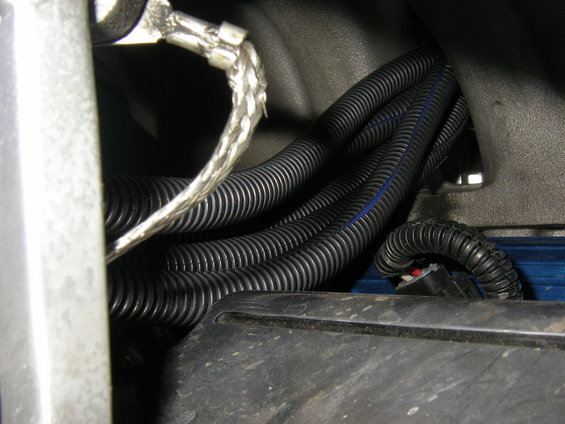
Protected with Wire Loom...
Image


Out the passenger side...
Image


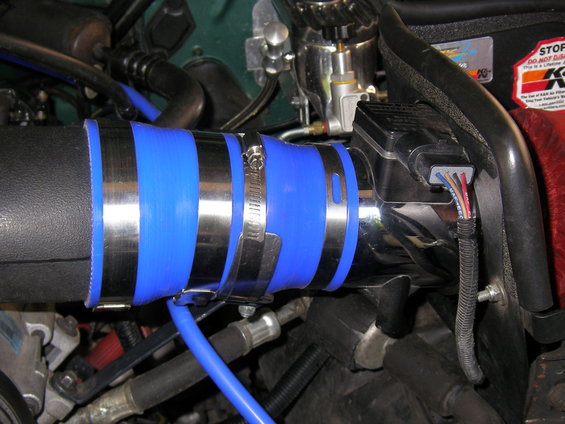
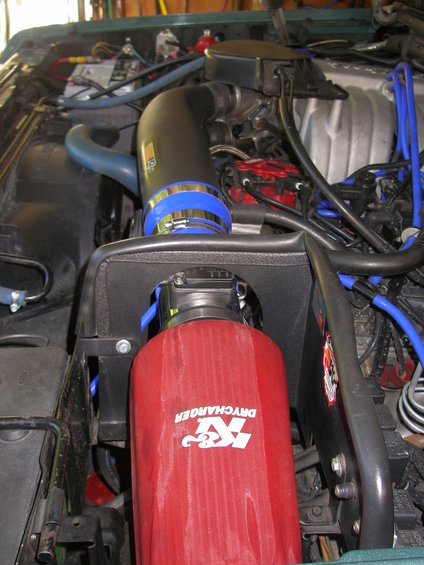
Plus a new Air Tube Adapter...
Image


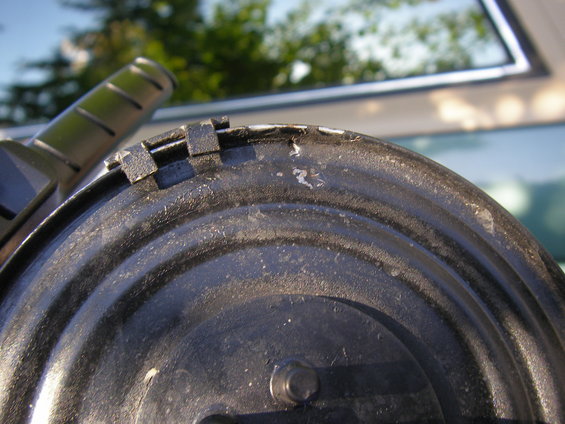
Found a vacuum leak!!!
Image


See the pin hole at the top?
Image


Patched it with Blue RTV and a plastic patch...
Image


Then swapped it with the good Cruise Control VRESER for good measure...
Image


I found the Cruise Control diaphram was leaking as well and temporarily capped it...
Image


All is good now. Thanks again Booba!!!
Image
Old thread, I know. But do you remember the size and amount of hose was required?
 
41 - 60 of 81 Posts